Showing posts with label lace. Show all posts

Sunday, November 13, 2016

Lace Gloves

So, I had a really cute Halloween costume idea, but I ended up with a migraine, so I didn't do anything for Halloween this year. Just as well because the dress I made for my costume was several sizes too big and I still haven't decided if it is worth the effort to fix. But before I knew all that I made myself a pair of gloves to go with my costume.


The pattern is called Ladylike Gloves. It is free on Ravelry. I've actually been eyeballing the pattern for a while but never had a good enough reason to make the gloves. Sorry, the picture isn't so great, it's really hard to take a photo of your own hand. 

The yarn is Rowan Fine Lace that I had left over from a shawl. The yarn is absolutely delightful, one of the most stunningly soft yarns I've ever had the pleasure of knitting with, but I have to say knitting these gloves was a nightmare. They are done on size three needles and when I started the only size 3s that I had were exceptionally slick metal. My needles kept slipping out of my work as I was knitting. 

I had to set the gloves aside while I hunted for a pair of size 3 double points in wood. Fortunately using wood did solve the slipping problem or I would never have finished these. 

Although I'm happy enough with the finished object I'm not really sure they were worth the effort. I've worn them to work once, and I do like that because of the lace pattern over the fingers I can use my touchscreen and not have to take my gloves off, which is cool, they just were not fun to knit.

Sunday, October 18, 2015

Sweaters: the Good and the Bad

So, remember back in August when I wrote this post about my orange cardigan and how much I liked it? Remember how at the end of the post I said I was a bit bummed that the yarn was handwash only, but it wasn't that big a deal? Yeah...I totally felted that sweater. I didn't even realize that it had ended up in the wash.

That face is the one that Fiance calls my "Muppet Face" because apparently only puppets should be able to frown that deeply. He thinks it's a creepy face, but I think it's appropriate for felting a sweater. Obviously the sweater didn't shrink too much, and it is still wearable, but it doesn't hang right anymore. I think it shrank more in length than width and the seams are oddly stiff now making the hips flair in odd ways. 


Not totally ruined, but not wonderful anymore either. 

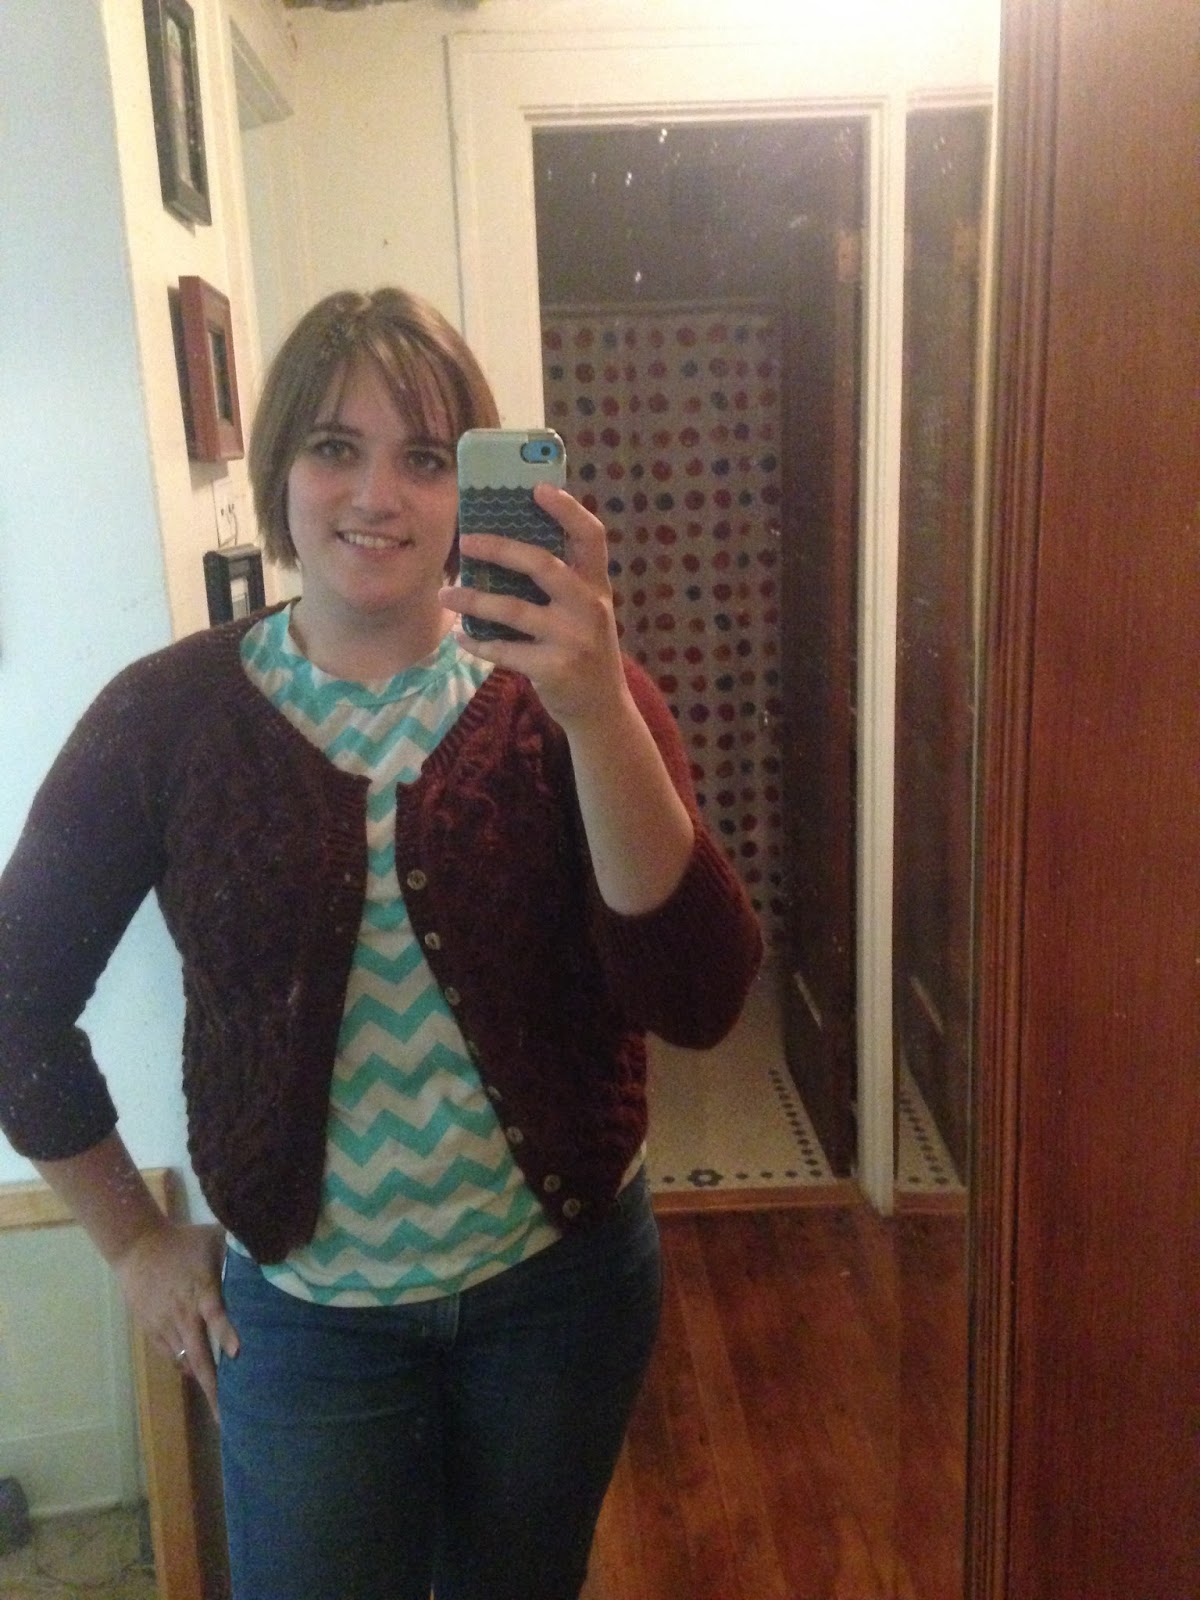
In better news I finished a new sweater this week. 


This one is also made with knit picks yarn, this time it's Palette. This one is also not superwash, so again I'll need to be careful (a bit more careful this time) when washing. I like the Palette line of yarns because it comes in so many wonderful colors, and it is inexpensive. It's got a little bit of that wool itch, but not enough to keep me from wearing it next to my skin. I used the color Hazelnut for this sweater, and it is a wonderful rich brown.  It's a bit lighter than it looks in the pictures. We've entered the rainy season here in Washington so I'm having problems getting good lighting for pictures again. 


The pattern is Casual Lace by Justyna Lorkowska. I know you can't really see the lace pattern in these pictures (grrrrr bad lighting) but it is a pretty pattern. It's a top down knit, I modified the sleeve length to be 3/4 because I have a habit of pushing my sleeves up and ruining them getting them all stretched out that way. One of the things I particularly liked about this pattern was the twisted rib used at cuffs, collar and bottom/button bands. I meant to take a close up picture of it and compare it to regular rib so you could see the difference, but I forgot. Oops. 

So, one messed up sweater, but one that turned out well. And maybe someday I'll even finish that darn sock...

Wednesday, September 16, 2015

Wedding Garter

Yesterday I talked about what I got Boyfriend for our anniversary. Well, today I'm going to talk about what he got me: an engagement ring! So Boyfriend is actually Fiance now. His gift was far more exciting than a truck bench seat cover. 

We have sort of decided on July for the wedding, so there is really no rush on making anything (but please do look forward to possibly a lot of wedding craft related posts, especially when I start making my dress). 

Even though I knew it was totally pointless and unnecessary when I have so few concrete plans, and so much time to go I wanted to start working on something wedding related, so I decided to crochet a garter. 

My grandmother taught me to crochet before she taught me to knit, so sometime around four or five years old. All I ever managed to make were long chains and triangles. The triangles made great doll clothes, but I never managed to make them that way on purpose, it was always because I was accidentally adding or dropping stitches. So in my head crochet is this tricky thing that I am really rather bad at. So why crochet a garter? Because I'm crazy. 

But much to my surprise it turned out not to be difficult. 

For my first attempt, I used the pattern Bridal Garter by Darlisa Riggs. Although I liked the look of it, it did come out to big, it fits around the very fattest part of my thigh, which is a bit higher than I want to wear it. I'm not super surprised. I used a number 10 crochet thread because it was all I could find, but the pattern called for number 30. I did cast on fewer stitches (is it even called casting on with crochet? I so don't know) but alas, too big. That's okay though. It was great practice and it really boosted my crochet confidence.

In fact, it boosted it to the point where I decided for my second attempt to just make up my own pattern. Yes, I really did go from thinking I didn't really know how to crochet to making up my own pattern and working on a 1.4mm hook.

I'm pretty happy with the finished result. I need some 1/4" ribbon for it, though. And yes, my leg really is that pale,


Here is roughly how I made it:

The lacey bit is in multiples of 8 sts, if you want to make it smaller or bigger

Using number 10 crochet cotton and 1.4mm hook

Ch 160
Join in the round (carefully not to twist it, that took me several tries)
rnds 1-3: sc in each stitch
rnd 4: ch 3 *tr 1 in next sc, ch 1, sk next sc,* repeat to end of rnd
rnds 5-6: sc in each stitch
rnd 7: ch 2, dc in each sc
rnd 8: ch 1, dc 2, *ch 9, sk 3 dc, dc 1 in each of next 5 dc* repeat ending ch 9, sk 3, dc 1 in each of next 2 dc
rnd 9: ch 1, dc 1 in next dc *ch 5, sk 1 dc and 4 ch, dc 1 in next ch, ch 5, sk 4 ch and 1 dc, dc 1 in next 3 dc* repeat ending ch 5 sk 4 ch and 1 dc, dc 1 in next dc, dc 1 in ch
rnd 10: ch5 *sk 1 dc and 5 ch, sc in dc work [ch 5, sc in dc below] 3 times, ch 5 sk 5 ch and 1 dc, dc 1 in next dc, ch 5* repeat ending in ch 5, sk 5 ch and 1 dc, dc 1 in ch
Fasten off.

I really hope that pattern makes sense. Not only have I never written a crochet pattern before I've never even really read one before. I had to look up every abbreviation here. Even with the whole, I have no idea what I'm doing thing, this only took me about five hours to make. And I can't believe that after nearly 20 years of knitting, the first pattern I'm writing down and sharing is crochet!

If you have any questions about the pattern please leave a comment.

Thursday, September 3, 2015

Tatted Handkerchief Edges

Man, I have been distracted the last two weeks. I had a big party for my fifth anniversary and I will write posts about what I made for it, but I haven't taken any photos yet because my mom and I were so busy having fun at the party that we forgot to take any photos. Oops.

In the mean time, I finished a tatted hanky edge a while back, and I'm almost done with another, so I thought I would throw up some pictures of those.

With this one I was practising rings, and reversing my work. It's a pretty simple pattern, 3ds p 3ds p 3ds for both the rings and the chains.


And here is a close-up of the corner of my current project. It's the same pattern as the last handkerchief, but this time I learned how to join the picots in the rings. It's just one tiny difference, but the whole thing looks prettier, flatter, and somehow more finished. I've just got one last edge to go on it and then I'll put up the finished picture. 


I think my favorite thing about both of these edges was putting the ring on the corner. It looks really pretty, if I do say so myself. 

Friday, August 14, 2015

My Orange Cardigan

So, I did not finish the second sock this week. Shame on me, I know. But I did finally finish a cardigan that I started in February and I am pretty happy about that.


This cardigan took me forever to finish knitting because the pattern gave me absolute fits. It's Ann's Cardigan from the Knit Pick's website. The finished product is adorable, and I'm happy with it, but I had to modify the front and the sleeves to actually get it to work. 

The front I changed the rate of decreases to shape the v-neck (decreased every RS row instead of every fourth row) because when I followed the pattern I ended up with the front three inches longer than the back.  That could just have easily been my guage as the pattern though. I always check horrizontal guage but I rarely check verticle. Bad me, I know, but length is easier to adust on the fly then width (side note: it was a good thing I checked on this sweater because I had to go down two needles sizes before I got gauge so either I knit really loosly or the designer knits tight).

The sleeves were really what gave me fits on this pattern.


I'm really happy with the way they turned out, but it took me four trys to get them right. I ended up working my increases into every 10th row until I had 99 sts on the needle. The pattern didn't have steady increases and I think the furthest apart the increases were done was every 6 rows. The sleeves as written were seriously oddly shapped and I could have fit both my arms in one sleeve. 

I ended up just sort of guessing how to shape the sleeve cap, and I pretty much just got lucky that it worked. To shape the sleeve cap I: BO5 at beg of next 4 rows, work decrease (k2 ssk…k2tog k2) row 12 times every RS row, BO 2 sts beginning of every row 6 times, BO 4 sts at the beginning of next 4 rows, BO remaining sts.

The sleeves maybe ended up a little long, but I like to be able to cover my hands with my sleeves so that doesn't bother me in the slightest. 

Like I said, it may have been some extra work but I am happy with how it turned out. here is a picture of the back so you can see the lace design there.


I do have to take a moment to praise the yarn. It's Knit Picks Gloss Fingering in the colorway Masala. The color is a beautiful rich orange and the yarn is soft and warm. I would totally buy this yarn again. It's pretty reasonably priced for a wool/silk blend (and oh boy can you see the silk in the luster of this yarn). The only thing I don't like is that it's hadwash only because it might felt, but what's a little handwashing in the grand scheme of things?

Friday, July 31, 2015

Gosh That's nice, That Lingerie

I am currently a little bit obsessed with Gertie Hirsch. I have bought most of her Butterick patterns. Today I'm going to talk about pattern 6031. Gertie's blog has a wonderful series of tutorials on how to make the slip from the pattern. I've made this slip once already, which I talked about in this post. Incidentally, I think I now have a personal rule that posts about my underwear must be titled with ridiculous quotes/references. 

Today is really just about posting pictures of the rest of what I made from that pattern. I made three versions of the camisole. One in black


And two in white. All three are the longer version because I've got a long torso. I only took a picture of one of the white ones because they look the same. I didn't have enough black lace to edge the bottom of the black camisole, but I did do both of the white. They are made with knit fabrics so the finish wasn't strictly necessary, but I thought they looked sort of raw without the lace. 


I even went back and added it to the first nude slip. I had initially not wanted it because I thought it would make the slip not move as smoothly underneath a dress, but upon further consideration I've decided that I don't care because it looks so much prettier this way. 


I made two more of the slip too, again one in black.


And one in white. 


With the nude slip I used lingerie elastic (you know, the stuff with the picot edge on one side) to finish the top edge, but on the black and the white slips and the camisoles I just sewed lace all the way around. I initially was just going to leave it raw - I was feeling cheap and didn't want to pay for the lace or elastic - but the fabric started to sort of run on me. Not a lot, but enough to make me want to finish the edges. You can see the run in this photo.


All in all, they were inexpensive, fun to make, fit well, and are really comfy. The fabric is soft, although it doesn't breath super well (pretty sure it's 100% polyester, but I didn't look that closely at the label). They are too low cut to wear the camisoles as tanks, but they make great undershirts, which was really what I wanted them for. The white slip works really well underneath the stripped skirt I posted about last time. I think I'm done with the pattern for the moment, but I feel like I got some good use out of it. I'm sure as some point I'll make the panties, but not out of the same fabric. I like a higher cotton content for my underpants. 

In another couple of posts I'll talk about other Gertie patterns that I've been working on.

Wednesday, April 29, 2015

Here We Are Complete Strangers and I'm Flashing You My Knickers

Okay, so maybe a full slip isn't the same as underpants. In fact, I've seen women in dresses that covered less than this slip, but it still feels like I'm showing off my underwear. I made this slip to go under the wrap dress that I talked about previously. The fabric that I used for that dress was very lightweight and loosely woven, and I always worry about wraps shifting so a slip was basically a necessity.


The fabric is a polyester knit. Normally I would avoid poly fabrics like the plague, but this one was the only one that was the right color, and it actually feels surprisingly good against my skin. Normally polyester makes me sweat, but this one is okay. 

The pattern is Butterick 6031. I love the Patterns by Gertie. On her blog, Gertie's Blog for Better Sewing, she does a sew along of this slip and it was very helpful. I skipped doing the lace around the top, under the bust, and along the hem, although I did still use lace for the straps. I did use picot elastic along the top so that there was still something to give it a little structure.


The pattern actually has instructions for doing adjustable straps, like on a bra. I made them that way the first time, but using the measurements as called for in the pattern left them inches too short. By the time I got around to redoing the straps so that the slip lay correctly I was feeling impatient so I just cut the lace to the right length for me and sewed it on. I don't feel like I'm missing out on anything by not having adjustable straps. 

The other thing to note with this pattern is that you really do need to follow their instructions for determining your cup size. In a normal bra I'm a DD, but with this pattern I used the pattern pieces for a C cup and it fits perfectly, so don't assume that you can skip that step and just use your normal cup size (and oh boy does it feel like oversharing to say that, but I think it's important to know).


Because the fabric is a knit (and I was being lazy) I didn't bother to hem the bottom. I've got enough lace left from the straps that I might add it, but then again, probably not. I don't really like lace on my slips because although it looks beautiful it can cause the fabric of whatever I'm wearing over the slip to catch and stick, thus defeating the purpose of most slips. 

Someday I would love to make another of these with all the lace because I do think it looks pretty. When I do that though I will probably being making it with intent to wear as pajamas. This slip is way super comfy and I could happily sleep in it. 

Oh, and if you know what I quoted for the title you get extra special geek points. :)

Wednesday, March 4, 2015

Pi-shawl

Well, on Saturday I said I would post about my Pi Shawl "tomorrow" and it's now Wednesday. Anyone else ever had those weeks where they blink and several days have gone by?

Regardless of what day it is, I'm finally sitting down to write about it. My original goal was to finish the shawl by February 13th, so I could wear it to a friend's funeral. I grossly underestimated how long it would take me to finish the shawl. Even working like mad it took me until the 24th. I'm okay with that though because I think the shawl turned out beautifully.

It was surprisingly difficult to get a photo of it blocking. I had to stand on a step-stool to get high enough to get the entire thing in the frame. The shawl is just a bit less than 5 feet in diameter. As you can tell in the photo I use child's play mats for my blocking. This has the advantage of being much cheaper ($16.99 for 26 12"x12" mats) but I'm a little afraid of color transfer, so I only use them for my darker projects. As this one was done with black yarn I wasn't too worried. I also have to say if you ever make this shawl make sure you have a lot of pins handy when you block it. I used every single one of my pins to block this shawl. It's got to be lucky having exactly the right amount, right?


Here is a photo with the shawl thrown on my bed so you can see the lace pattern a bit more clearly. The pattern is Heliotaxis Pi Shawl and it's available for free on Ravelry. It's a great pattern, well written, and it's available charted and written out. I found it fairly easy to follow, although I did have to rip out this shawl at three different points. That is more on me because I refuse to use lifelines and occasionally I forget how to count.

And speaking of ripping out, I just have to gush about this yarn for a moment. I used Rowan's Fine Lace. This yarn is 80% alpaca, 20% merino wool. Normally neither lace weight nor alpaca is known for its ability to bounce back after being ripped, but this yarn handled it like a champ. It's also incredibly soft. I owe my boyfriend's mom a huge thank you for giving me this yarn for Christmas.It was a real pleasure to work with and I will absolutely use it again (and for the record, I am in no way affiliated with Rowan, but I do really like their yarns).

I hope you like my pi-shawl as much as I do. I'll be back "tomorrow" to talk about the pillowcases I made last weekend.

Saturday, February 7, 2015

ArtChain Day One

I don't know if y'all have seen it, but there is a hashtag making the rounds called #artchain. I have never used a hashtag before today, but my friend Holly tagged me so I'm participating. Even though I made this blog with the intention to document current projects I thought I would go ahead and post my artchain projects here in addition to facebook. Today I posted the knitting project about which I am most proud.

I designed the skirt, socks, and gloves myself. The skirt won me a blue ribbon from the county fair last summer, and I got third place for the socks. 


All the yarn is a lace-weight recycled cashmere/silk blend from the Etsy shop Penelopes Fine Yarns (with which I am in no way affiliated). Check out the shop if you want luxury yarns for affordable prices. The owner is super nice and the yarn ships quickly.

Anyway, the socks were made on size 000 needles, the gloves were made one size 1 and the skirt and shawl were size 6. I used about 3000 yards of yarn and I have no idea how many hours it took me. I tried to keep track, but I lost the exact number. If I had to hazard a guess I would say I spent more than 200 hours, about 100 of which was just one the socks. 

The skirt comes just below my knees, the socks come a couple inches above them. The gloves around a couple inches above my elbow. 


I have a confession to make about these clothes. Other than trying them on to make sure they fit, I've never worn these items. They are my most time-consuming and labor intensive project of all time and I'm afraid of ruining them. I guess I just haven't had the right occasion. Even if I never do wear them, I think that might be okay. They were made for the art of it, and they make me happy just to look at.

So there you have it folks. ArtChain day 1. 


Wednesday, February 4, 2015

Confirmation

It's official, I'm back to where I was before I frogged my shawl, and taking it apart was the best decision I could have made. It looks a million times better on the larger needles. And I realized that I had reversed the symbols for k2tog and ssk on my first go round. It looks much nicer not having the stitches reversed. In case you ever wondered the direction of decreases really does make a difference when you are looking at the finished project, especially with lace. It's also knitting up much faster this time. I guess familiarity can be a good thing. I'm hoping to have the shawl finished by Friday the 13th. Wish me luck.

Monday, February 2, 2015

Commited

At what point in a project is it too late to go back? When do you decide that you've now invested too much time and you are just going to finish it no matter what it ends up looking like?

For the last week, I've been working on The Heliotaxis Pi Shawl. Right off the bat I want to say that it is a beautiful shawl with well-written, easy to follow instructions. That didn't stop me from screwing it up though. By the time I finished the first chart I knew that I should have used bigger knitting needles. I cast on on size 1 thinking I would like the look of the lace better, but I should have gone with the size 3 that the pattern recommended. But having completed a chart I was reluctant to start over again. I thought I could still make it work.

Here is a picture of it, on the needles after completing the fourth chart.

As I was attempting to do the second repeat of the fourth chart I realized that I had screwed something up somewhere because I had an extra stitch in each pattern repeat. I thought I could fix it but the error kept compounding. 6 rows later I knew I would have to go back and try and find and fix the original error. But here's the thing, I don't use lifelines when I am knitting. So I was either going to have to tink (for those not familiar with the word that means knit backwards) 6 or more rows, which would be simultaneously boring and difficult and would take hours. My only other option was to rip it all the way out and start over.

Here it is, of the needle and about to be ripped. I know unblocked, black, lace is hard to see, I just wanted you to get an idea of how far I had gotten. It's about a foot in diameter, unblocked here.


And here is my yarn, all wound back up into a ball. I don't know why it looks so blue, this is definitely black yarn. Lighting is weird. 


I think if I had started off on the right sized needles I would have tinked. Ripping out a solid week's worth of knitting just isn't any fun at all. But if I had persevered in the end I would have saved myself a week's worth of knitting, but I might have ended up with a project that I was never really happy with or never wore. That seems like a much greater waste of time to me. 

What do you think? Would you have ripped, tinked, or just kept going?