Showing posts with label linen. Show all posts

Tuesday, October 4, 2016

Linen Tunic Pattern

Ah fall, it is by far my favorite time of year. It is the time of year for showing off cute sweaters before they are hidden underneath bulky winter jackets. It's also got the best color pallet, dark greens, rusty reds, navy blue and black. I love it.

I decided to celebrate the fall this year with a new knitted tunic. I had some wonderful linen yarn (Lindy Chain by knitpicks.com - who I am totally not affiliated with, I just like it) that was recycled from a different sweater that I knit but never wore. Linen has absolutely wonderful drape, which made it perfect for a loose fitting a-line sweater, but less than ideal for the more fitted cardigan I had originally knit. Live and learn.

So I searched Ravelry for a top-down, a-line, crew neck, short sleeve tunic, in a fingering-weight yarn, but such a pattern didn't seem to exist. So, I wrote one, and now I'm sharing it with you.


I think this is a great transitional piece because when it's still slightly warmer is looks great over some leggings with just a cami underneath, but as the weather cools it will work with a long-sleeve shirt and a pair of jeans instead.


Linen Tunic:

Materials:
11 skeins (1198 yds) Lindy Chain in colorway Linen.
US 3 double point needles or 16" connected needles
US 5 connected needles.

Guage:
27 sts by 33 rows equals 4” in St st.

Size:
Would fit 38-42” bust. Pictured on 40” bust with 2” positive ease.

Instructions:

Neck:
On size 3 needles CO 130 sts, join in round, work k1p1 ribbing until neckband measures 1” Switch to size 5 needles.
place marker for beginning of round and at 65th st.

Shape back of neckline:
K60 sts w&t, p55 sts w&t, k52 sts w&t, p49 w&t, k46 w&t, p43 w&t
knit 2 rnds, picking up wrapped stitches and knitting them as you go

Begin shoulder shaping:
Round 1: Place BOR marker k5 m1 pm k1 m1 k53 m1 k1 pm m1 k10 m1 pm k1 m1 k53 m1 k1 pm m1 k5
Round 2: k
Round 3: k to marker m1 sm k1 m1 knit to 1 stitch before marker m1 k1 sm m1 knit to marker m1 sm k1 m1 knit to 1 stitch before marker m1 k1 sm m1 knit to BOG marker

Repeat rounds 2 and three until there are 120 stitches each for front and back and 74 sts between sleeve markers

Place sleeve on holder, CO 5, pm (new BOR marker), CO 5, knit to next marker, place sleeve markers on stitch holder, CO 5, pm, CO 5 knit to end of round


Body:
Rnds 1-10: Knit
Rnd 11: knit to 1 stitch before pm, m1, k1, sm, k1, m1, knit to 1 stitch before pm, m1,k1, sm, k1, m1
Repeat rounds 1-11 until 1” shy of desired length is reached. (pictured length is 29" so knit 28" from neckline)
Switch to k1p1 ribbing for 1”
BO in pattern

(note: the goal for me was using up all my yarn, so after knitting a couple of body rounds I paused and finished the sleeves, that way I could just knit the body until there was no yarn left.)

Sleeves:
Pick up ten stitches from underside of arm
K 18 rounds
knit k1p1 rib for 9 round
BO
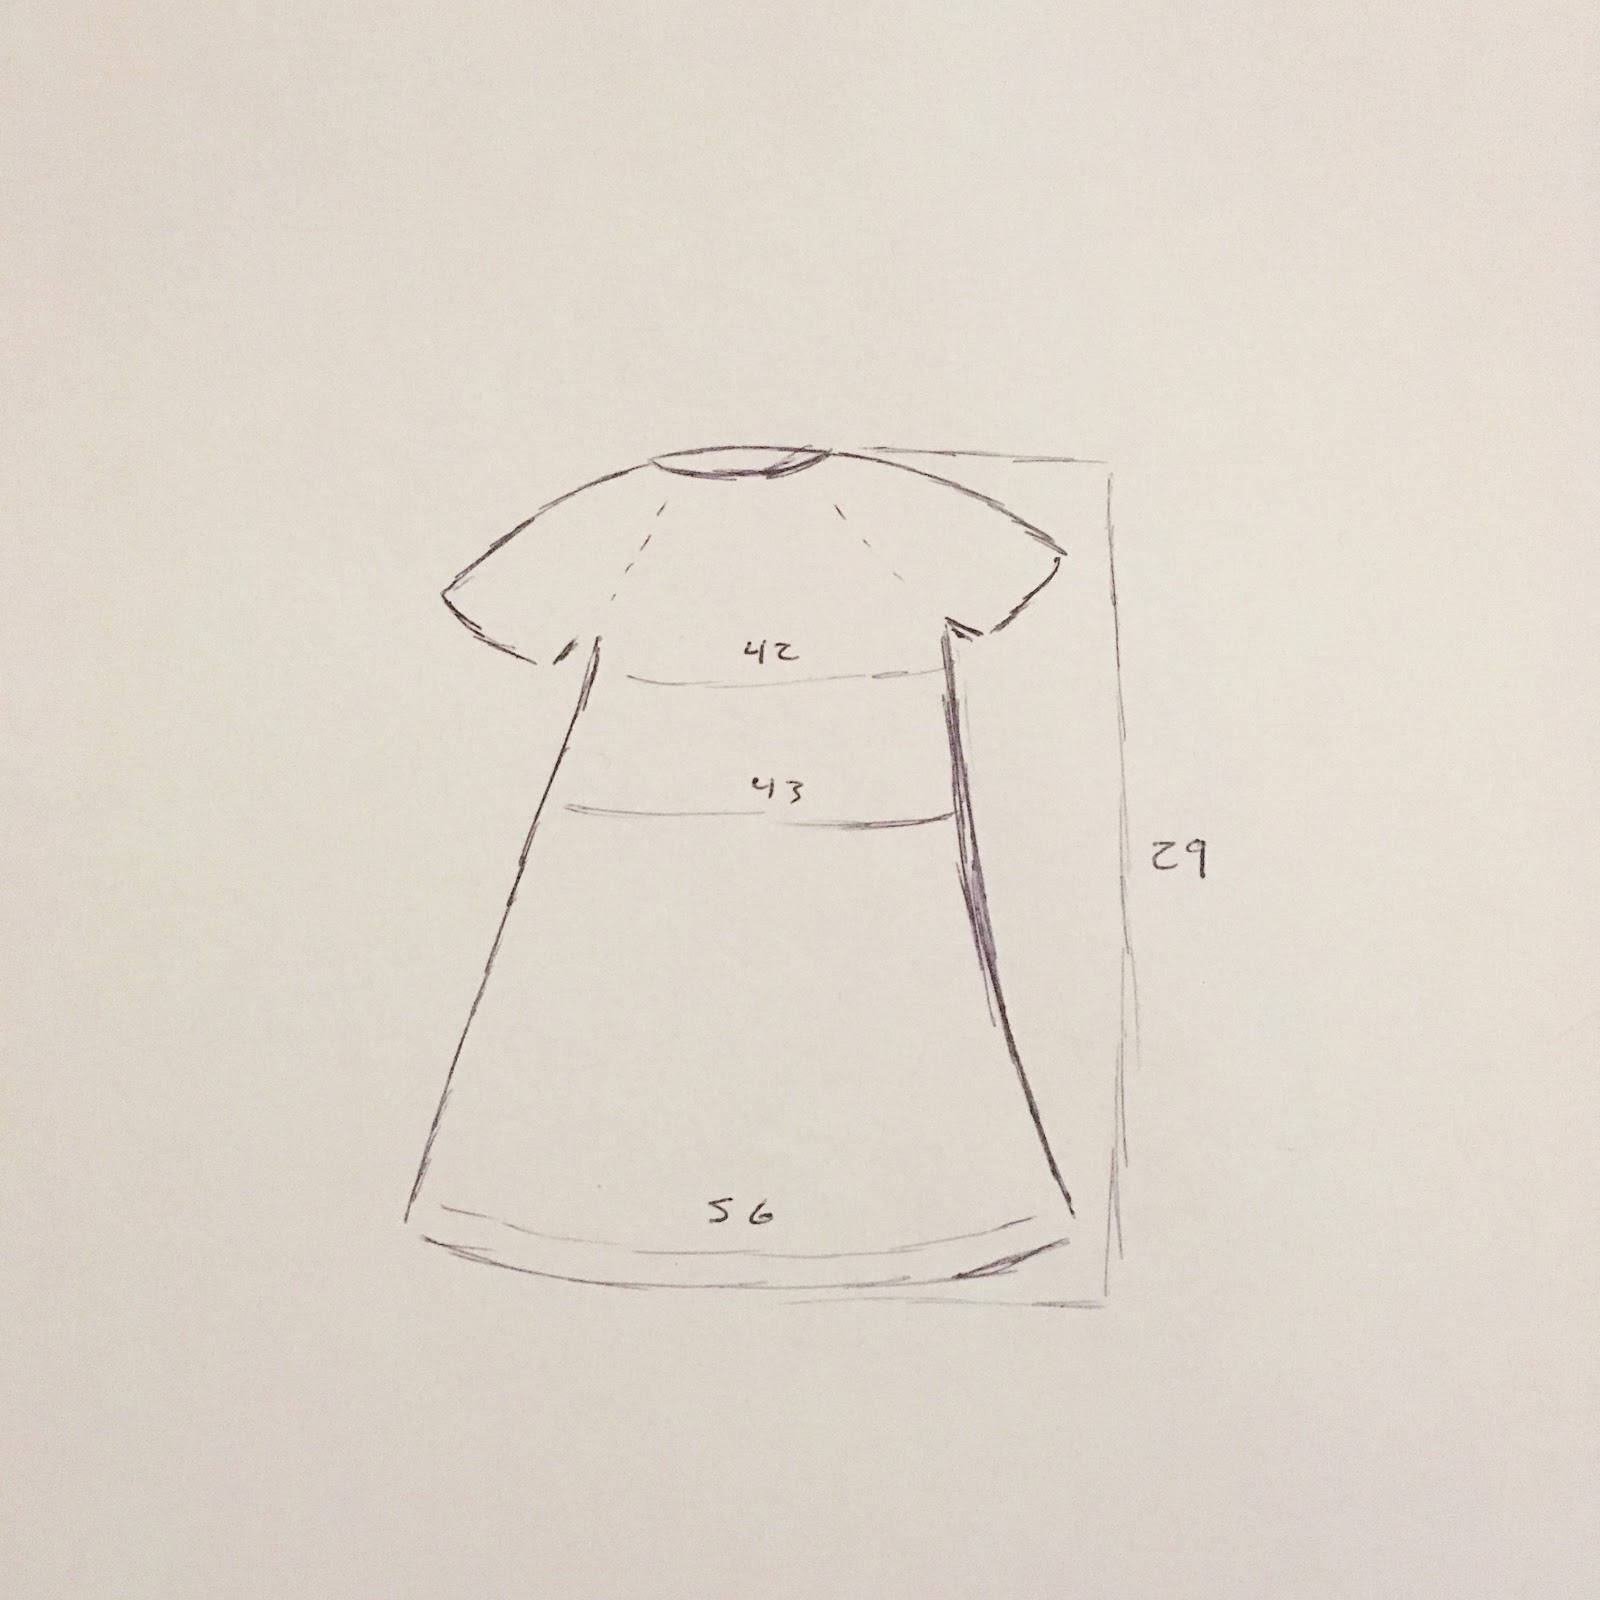
I am not great at drawing, but here is a rough sketch to show the finished shape and measurements of the tunic.


I am very pleased with this tunic, and I hope that you like it to, if you have any questions please don't hesitate to leave a comment. This is my first time writing a knit pattern and just because it makes sense to me doesn't mean it's as intuitive to everyone else. 

Shout out to my friend Hilary from The Cutie Life for helping me take pictures. Thank you! 


Sunday, August 21, 2016

Sorbetto Top

Whelp, I jumped on the Sobetto bandwagon. It seems like every sewer has to make at least one of them (I'm sure that is totally not true at all, but it is a pretty common pattern and I've been seeing a lot of it this summer). If you don't know, the Sorbetto Top is a delightfully versatile tank top and Colette Patterns is kind enough to offer it as a free download.

I had never actually tried printing out and sewing a multipage pattern before. It took me several tries to get it to print the right size. On my particular printer I had to use the zoom function and print at 106% size to get the test square to be the requiste 4"x4" and it took me 6 tries to figure that out. Once I got over that hurdle though the pattern was easy to tape together.

I ended up making two tops in one weekend. After making the wedding vests I had between 3/4 and a yard of mid-weight linen leftover. The pattern calls for both the front and back pieces to be cut on the fold, which would not have fit on what I had left, so instead I added 5/8" to the back and just put a seam down the middle. On the first top I did a mock-french seam because I forgot that I meant to do french seams, but on the second I remembered and did a proper french seam. Linen unravels like crazy so you need a good strong finished seam. Because I have a slight obsession with french seams that is what I used for everything.


Aren't they just so pretty though! That is one of the shoulder seams of the second top that I made. It pleases me to look at, all nice and finished with no unsightly raw edges anywhere. 

Here is a picture of the first Sorbetto Top that I whipped up. For this one, other than adding the back seam, I followed the directions. The blue bias trim is a single fold bias tape, applied the same way you would do a bias facing, but flipped to the front instead of the back to make a cute little detail. 


And speaking of cute details, I also added three buttons. I had way too much fun doing decoritive stitching because they aren't functional buttons. 


The only fit issue I encountered was the arm holes came down too low and part of my bra was visible through them. To counteract that I shortened the sleeves at the shoulder seam. I think I shortened them a bit too much because Husband says it looks like the arms are pinching, but I find the top very comfortable. Unfortunately, because I shortened the top through the shoulders the whole thing is a bit shorter than I would have preferred. 

So on the second top I made a few changes. I added about half an inch of fabric to the underside of the sleeve in order to insure that my bra was covered. I also added four inches to the bottom to get a more tunic length top.


I also inverted the front pleat and left it loose at the bottom. It maybe looks a bit maternity top-ish (Husband says "it is rather ambigious through the torso") but it is also super cool and comfortable and it's been hotter than heck the last week, so I will take looking like I may or may not be pregnant if I can also be a comfortable temprature.


The only other change that I made was using double fold bias tape instead of single fold. I would like to say I had a design reason for doing that, but really, I just grabbed the wrong package at the store. I'm glad that I did though, in the end I like the double fold bias tape better, not enough to change the first one, but enough that if I make this top again I will probably stick with double fold bias tape for the edges. 

And I do think I'm going to make it again. It's a pretty versitle pattern, especially for free. I kind of want to lengthen it an additional four to six inches with the inverted pleat and use it to make night gowns because it is just that comfortable a top. I'm also dreaming of versions with sleeves, but that will never help me get rid of that aweful farmer's tan.

Sunday, July 31, 2016

Linen Vests

I was so caught up in trying to finish wedding projects that I didn't really post much about what I was actually doing. In addition to sewing my own dress, I also made vests for my husband and for our friend who officiated for us.

The vests are fully lined with bemburg rayon, the outer fabric is a mid-weight 100% linen from fabric-store.com. I've ordered from them a couple of times and their fabric is just delightful. Linen isn't particularly easy to work with because it likes to try and slip off grain and it unravels with amazing speed, but it's well worth the effort, I love the feel of linen. Husband's vest is just a bare shade lighter than our officiant. I think the colorways were Asphalt and Graphite.

Retrospectively I wish I had used a lighter fabric to line Husband's vest, but there really wasn't one available to me.


And you can see how quickly linen wrinkles in these photos. I pressed everything while I was sewing then I threw them over a chair to wait until I had better lighting to take photos and in just those couple of hours they wrinkled. Husband also didn't like how the pockets were laying on his, so I sewed them shut, even though those welt pockets took longer to sew than all the rest of the vest. 


Don't the boys look handsome wearing their vests though? I was nervous beyond all belief making one for our friend. I think it's the first time I've sewed a garment for someone other than Husband or myself and Husband had a less than enthusiastic response to his the first time he saw it (because of the wrinkles) so I was terrified our friend wouldn't like his either.


All in all, I am really happy with the finished result. I think it was just what they needed to look extra dapper without being too warm (which is also why they are in linen rather than wool or a poly blend). I just think suit jackets at a summer wedding would be torture.

So, expect a couple more wedding project posts while I get caught up, and then I promise we can move on and I'll go back to just whatever random pattern catches my fancy. 

Thursday, October 8, 2015

Linen Pencil Skirt

Last post I talked about my linen pleated skirt that didn't go according to plan, this post I want to share with you a linen skirt that worked out just fine.

Even though I really like the company that I work for, I was trying to make a nice outfit for job interviews because Fiance and I wanted to move back down south of Seattle to be close to our friends again and it didn't look like I could move and keep my current job. But I totally lucked out because a position within my company opened up in Tacoma, so now I don't have to find a new job. Hurray!

However, having a nice professional outfit ready to go is not a bad idea, so I decided to continue with the project anyway. I had some black linen left over from the pleated skirt, and pencil skirts don't really require a lot in the way of fabric. I used the McCall's pattern 5523 view d. It was a super simple pattern to make. I used french seams to make sure everything was nice and clean and neat on the inside.

I am pretty happy with the way the skirt came out, but holy smokes that thing about linen wrinkling is totally true. I had the skirt all nice and pressed when I finished sewing it, but it was too dark for pictures at that point, so I hung it up. When I took it out to take pictures less than a week later this is what it looked like.


I can live with the wrinkling, I'll just have to allot extra time for ironing whenever I wear this skirt. I should have pressed it before I took pictures, but I was in a hurry, so we are pretending that I did it this way to show the wrinkle factor. 

And the back is so cute. I love the little ruffle details. It is professional and fun at the same time. 

All in all I am happy with the way it turned out. It fits me well, the length is good, and I can totally wear it to interviews or to the once a year meeting that requires more professional attire. Or any other semi-nice occasion. I will need to make a black slip to wear underneath it though. The skirt isn't lined and I feel like the fabrics got just a hair too loose a weave to risk not having a slip. 

Saturday, October 3, 2015

How Not to Make a Pleated Skirt

I swear this is my last post about the weekend at the Wooden Boat Festival. I wanted to keep my boat themed outfits going so I wore my t-shirt with anchors on it. I made the t-shirt ages ago, but the skirt was one I had only recently finished.


When I started the skirt I had intended to make a tutorial on how to make a pleated skirt, but I pretty much did absolutely everything wrong, so instead I'm calling this how not to make a pleated skirt. 


 First: fabric choice. I used a mid-weight linen from fabric-store.com. I chose linen for a couple of reasons:
 1) I thought because it wrinkles easily it would hold a crease for the pleats. WRONG. The pleats were totally invisible, like, 30 minutes after I pressed them in. The wrinkles stayed just fine though.
2) There is a dress I want to make that incorporates pleats and before I used up four yards of linen on it I wanted to know if my finished object (FO) would look any good. I've now learned not to use linen for that dress.
3) I figured even if the linen didn't hold the pleats I would still end up with a cute, dirndl looking skirt, so it as a fairly low-risk experiment.

I will say that this linen is absolutely scrumptious. I love it. And I was at least right that even though the skirt didn't come out the way I envisioned I do still like the FO. Next time though I will skip the pleating and just gather the waistband like I did for my pink skirt.

So, I cut out a rectangle of fabric, carefully making sure that it was on grain and started marking my pleats at the top. Those white lines are 1/2 inch apart.


And here I'm about half way through gathering all the pleats. There ended up being 52 pleats. I pressed them all down once they were pinned. And this is where I stopped taking pictures because things started going wrong. 


My fabric managed the slip off grain, so when I sewed in my pleats they looked crooked. Bummer. I also sewed them down four inches and then realized that it looked ridiculous and unflattering, 2 inches would have been plenty. I solved that my nixing the waistband. Instead, I just folded over my pleated section. The pleats made the fabric plenty stiff and stable, so I didn't bother with interfacing or anything. That part actually went rather well. 

A note on zipper installation: linen unravels like crazy, so I gave myself a full inch of seam allowance for the zipper and did a clean seam finish before installing the zipper.

I had wanted the skirt to sit a couple inches below my waist and come to my knees. But it ended up too small to sit that low. I tried adding fabric, but I added too much, then realized the couple inches I needed to add looked ridiculous so I took it back off and just decided to wear it at my waist. That's the fashion now anyway. It's also shorter than I wanted because I'm wearing it high, and I lost two inches doing the waistband. My butt isn't hanging out though, so I can live with it. In fact, I think it's still longer than similar skirts I've seen in stores, and again this makes it more in keeping with current fashion. 

All in all, even though everything went wrong I'm still happy with the FO. It'll look cute in the fall/winter with tights, or in the spring/summer without which was part of my hope. I probably won't make a skirt this way again, but at least this one worked out alright.

Friday, May 1, 2015

Linen Sweater

So, on April 19th my mom finally met my boyfriend's mom. We went to see Swan Lake, which was fantastic, but we went to a matinee performance so that my boyfriend's family had time to drive home. A matinee, of course, meant I needed a new outfit because I had nothing in between too formal for day wear and too casual for the ballet. I had already started working on my wrap dress before I got the invitation to the ballet, and I had already purchased the yarn I used in the sweater too, but I had to rush a bit to get the sweater done in time for the ballet. I cast on the sweater on March 22 and the morning of the ballet I was sewing on the buttons.


I ended up running out of time before I finished a purse to go with it, but I think my outfit looks fabulous. 


The yarn is Knit Picks Lindy Chain in the colorway Linen. I've never knit with linen yarn before and I have to say it was awesome. I was sort of expecting something like cotton, soft, with a tendency to stretch. I've got to say that it was nothing like that. Yes, the finished fabric does stretch and you can see that it stays wrinkled (obviously I took these photos after wearing the sweater all day), but the yarn was amazing. Working with it, it had a kind of sensual roughness and it feels surprisingly heavy for a fingering weight yarn. The yarn is not soft, but it doesn't itch like some animal fibers, it just feels good. I'm already trying to think of other projects that will let me use it again. 


I feel like I'm going to have to wash this sweater each time I wear it in order to bounce it back to its original shape, just like a cotton sweater. I haven't washed it yet, so I don't know how much recovery it will actually have. In the future, I might avoid linen for sweaters on that basis, but I'm reserving judgment until I do actually wash it.


And speaking of the shape of the sweater: I used the pattern Peacock Eyes Cardigan. It was very enjoyable to knit. I think it might be the first top-down sweater that I've done and I really liked being able to try it on to get the length right. I have a long torso and my sweaters often end up a little shorter than I mean for them too, but this one was just right. I also liked that the pattern had an option for 3/4 sleeves. Usually, I go for long sleeves and then end up distorting the cuffs because I am forever shoving them up to my elbows. I think in the future I'm going to do more sweaters with 3/4 sleeves. 

All in all, I am very pleased with this sweater. It dressed up nicely with my dress, but I think it will also look great with a t-shirt and jeans and the color is a fantastic light neutral. Before the rush for the ballet I had intended to make this sweater with this yarn for it to function as a good versatile sweater and I think it will manage to be exactly that. 

Sunday, April 26, 2015

Linen Wrap Dress

Wow, it feels like it has been ages since I had time to write anything. I've been dealing with a crazy time-consuming project at work, which means I haven't been home during daylight hours for a while. I live in a basement so taking pictures is difficult at best and downright impossible if the sun has already gone down.

One of my recent projects was to make a white curtain in order to facilitate picture taking, but my boyfriend has not found the time to hang it for me yet, so I've been trying to make due.

Last Sunday I wore my wrap dress and had him take a few pictures of me while we hung around downtown waiting for my mom to get off the ferry.

I am so pleased with the way this dress turned out. The fabric was this linen/cotton mix from JoAnn's. With a coupon, it was a reasonable price. The fabric was kind of tricky to sew with because it was kind of "slippery" feeling. If you just touched the fabric you would never say slippery, if anything it has a kind of pleasantly rough textured, but when actually trying to sew with it the fabric just wanted to slip and slid all over the place. 

The fabric also wanted to fray pretty badly. Every seam is fully finished (flat fell on the top like I talked about in this post, french seams along the sides and waist, slip stitched neckline, rolled hem on the sleeves and a herringbone stitch hem). It was a great challenge to work with and I loved every second of it. I would totally work with this fabric again. 

(I'm giving some guys stink eye for trying to walk into my picture)

That being said, I don't think I will use this pattern again (Butterick 5030). Although it fits well enough, I am not completely happy with the neckline. I actually had to safety pin it shut because the line of the dress was such that I would have been flashing a lot of boob if I had let it fall where it wanted to. Maybe if I was smaller in the chest it would look better, but I'm not and it's only mediocre. I also would have liked a little more fullness in the skirt. My last issue was that I had to wear heels (and let me tell you, after a full day of walking around Seattle my feet were killing me, I was limping and whimpering a little bit trying to get back to my car) in order to get the line of the dress to fall correctly. I tried it on with ballet flats, but it just made my legs look short. If the dress was shorter so that it fell at or above my knees instead of below them I probably would have looked more balanced in flats.

All in all, I like the dress. I will totally wear it again. I like the forgiving nature of the wrap and I love the fabric. I just need to make a purse to go with it and I will call this a great outfit. Next couple of posts will be about the slip I made to go under the dress and the sweater. 

Oh, and I'm sure it goes without saying, but I am in no way associated with JoAnn's or with Butterick.

Thursday, March 12, 2015

Flat Fell Seam Sleeve Cap

Last night, about 3am I was laying in bed, contemplating my ceiling and wishing that I was asleep when I had an amazing 'no sh*t Sherlock' moment. I finally realized that I don't have to put together patterns as dictated by the directions. I can color outside the lines y'all!

See, I'm working on Butterick 5030*, it's this really cute wrap dress that I'm making with a lovely teal and white floral linen. The problem is the linen is a really loose weave. I'm also going to make a slip to wear under the dress so being slightly sheer isn't a problem, but I needed to construct the wrap in such a way that it wouldn't just keep unraveling to nothingness on me. I was already Frankenstein-ing the pattern a bit, I'm using the bodice from D/E/F, but the collar from A/B/C, the belt from A/D and the sleeves from C/F. So I figured if I'm already changing everything else, why not change the construction methods too?

And here is the bodice to my newest dress. Obviously I haven't added the collar yet, and I haven't hemmed the sleeves


I decided to do a flat fell seam for the shoulder and sleeve cap. Even though it seems to be the way most commercial button-up shirts are made I hadn't tried doing a flat fell on a sleeve cap yet because the curve seemed to make is trickier. 


It's hard to even see the second line of stitching on the sleeve cap, which pleases me because I'm not into a lot of visible top-stitching. You can see if on the shoulder seem here though. 


And this is what it looks like on the inside. See all those nice finished edges? yummy! I love those.


Rather than sew the sleeve together at the underarm and the side seams of the bodice then attach the sleeve I decided to attach the sleeve immediately after sewing the shoulder seam. It's hard to tell in the picture, but that allowed me to sew the entire side seam with a nice smooth french seam. It seemed to me that it would be easier and less bulky that way, rather than having to do the flat fell seam in the round while manipulating french seams. 

I'm pleased with how the dress is turning out so far. The flat fell on the sleeve cap was far easier than I thought it would be and it's definitely how I am going to sew my sleeve caps in the future. Hurray for 3am realizations that I don't have to follow the directions step-for-step in order. 

*I am in no way associated with Butterick, although I would dearly love to work for them, I do not at the present. I've just been making a lot of their patterns lately because they fit me with little to no alterations needed, and, more importantly, they were on sale for $1.99 at Jo-Ann's recently.