Showing posts with label tunic. Show all posts

Tuesday, October 4, 2016

Linen Tunic Pattern

Ah fall, it is by far my favorite time of year. It is the time of year for showing off cute sweaters before they are hidden underneath bulky winter jackets. It's also got the best color pallet, dark greens, rusty reds, navy blue and black. I love it.

I decided to celebrate the fall this year with a new knitted tunic. I had some wonderful linen yarn (Lindy Chain by knitpicks.com - who I am totally not affiliated with, I just like it) that was recycled from a different sweater that I knit but never wore. Linen has absolutely wonderful drape, which made it perfect for a loose fitting a-line sweater, but less than ideal for the more fitted cardigan I had originally knit. Live and learn.

So I searched Ravelry for a top-down, a-line, crew neck, short sleeve tunic, in a fingering-weight yarn, but such a pattern didn't seem to exist. So, I wrote one, and now I'm sharing it with you.


I think this is a great transitional piece because when it's still slightly warmer is looks great over some leggings with just a cami underneath, but as the weather cools it will work with a long-sleeve shirt and a pair of jeans instead.


Linen Tunic:

Materials:
11 skeins (1198 yds) Lindy Chain in colorway Linen.
US 3 double point needles or 16" connected needles
US 5 connected needles.

Guage:
27 sts by 33 rows equals 4” in St st.

Size:
Would fit 38-42” bust. Pictured on 40” bust with 2” positive ease.

Instructions:

Neck:
On size 3 needles CO 130 sts, join in round, work k1p1 ribbing until neckband measures 1” Switch to size 5 needles.
place marker for beginning of round and at 65th st.

Shape back of neckline:
K60 sts w&t, p55 sts w&t, k52 sts w&t, p49 w&t, k46 w&t, p43 w&t
knit 2 rnds, picking up wrapped stitches and knitting them as you go

Begin shoulder shaping:
Round 1: Place BOR marker k5 m1 pm k1 m1 k53 m1 k1 pm m1 k10 m1 pm k1 m1 k53 m1 k1 pm m1 k5
Round 2: k
Round 3: k to marker m1 sm k1 m1 knit to 1 stitch before marker m1 k1 sm m1 knit to marker m1 sm k1 m1 knit to 1 stitch before marker m1 k1 sm m1 knit to BOG marker

Repeat rounds 2 and three until there are 120 stitches each for front and back and 74 sts between sleeve markers

Place sleeve on holder, CO 5, pm (new BOR marker), CO 5, knit to next marker, place sleeve markers on stitch holder, CO 5, pm, CO 5 knit to end of round


Body:
Rnds 1-10: Knit
Rnd 11: knit to 1 stitch before pm, m1, k1, sm, k1, m1, knit to 1 stitch before pm, m1,k1, sm, k1, m1
Repeat rounds 1-11 until 1” shy of desired length is reached. (pictured length is 29" so knit 28" from neckline)
Switch to k1p1 ribbing for 1”
BO in pattern

(note: the goal for me was using up all my yarn, so after knitting a couple of body rounds I paused and finished the sleeves, that way I could just knit the body until there was no yarn left.)

Sleeves:
Pick up ten stitches from underside of arm
K 18 rounds
knit k1p1 rib for 9 round
BO
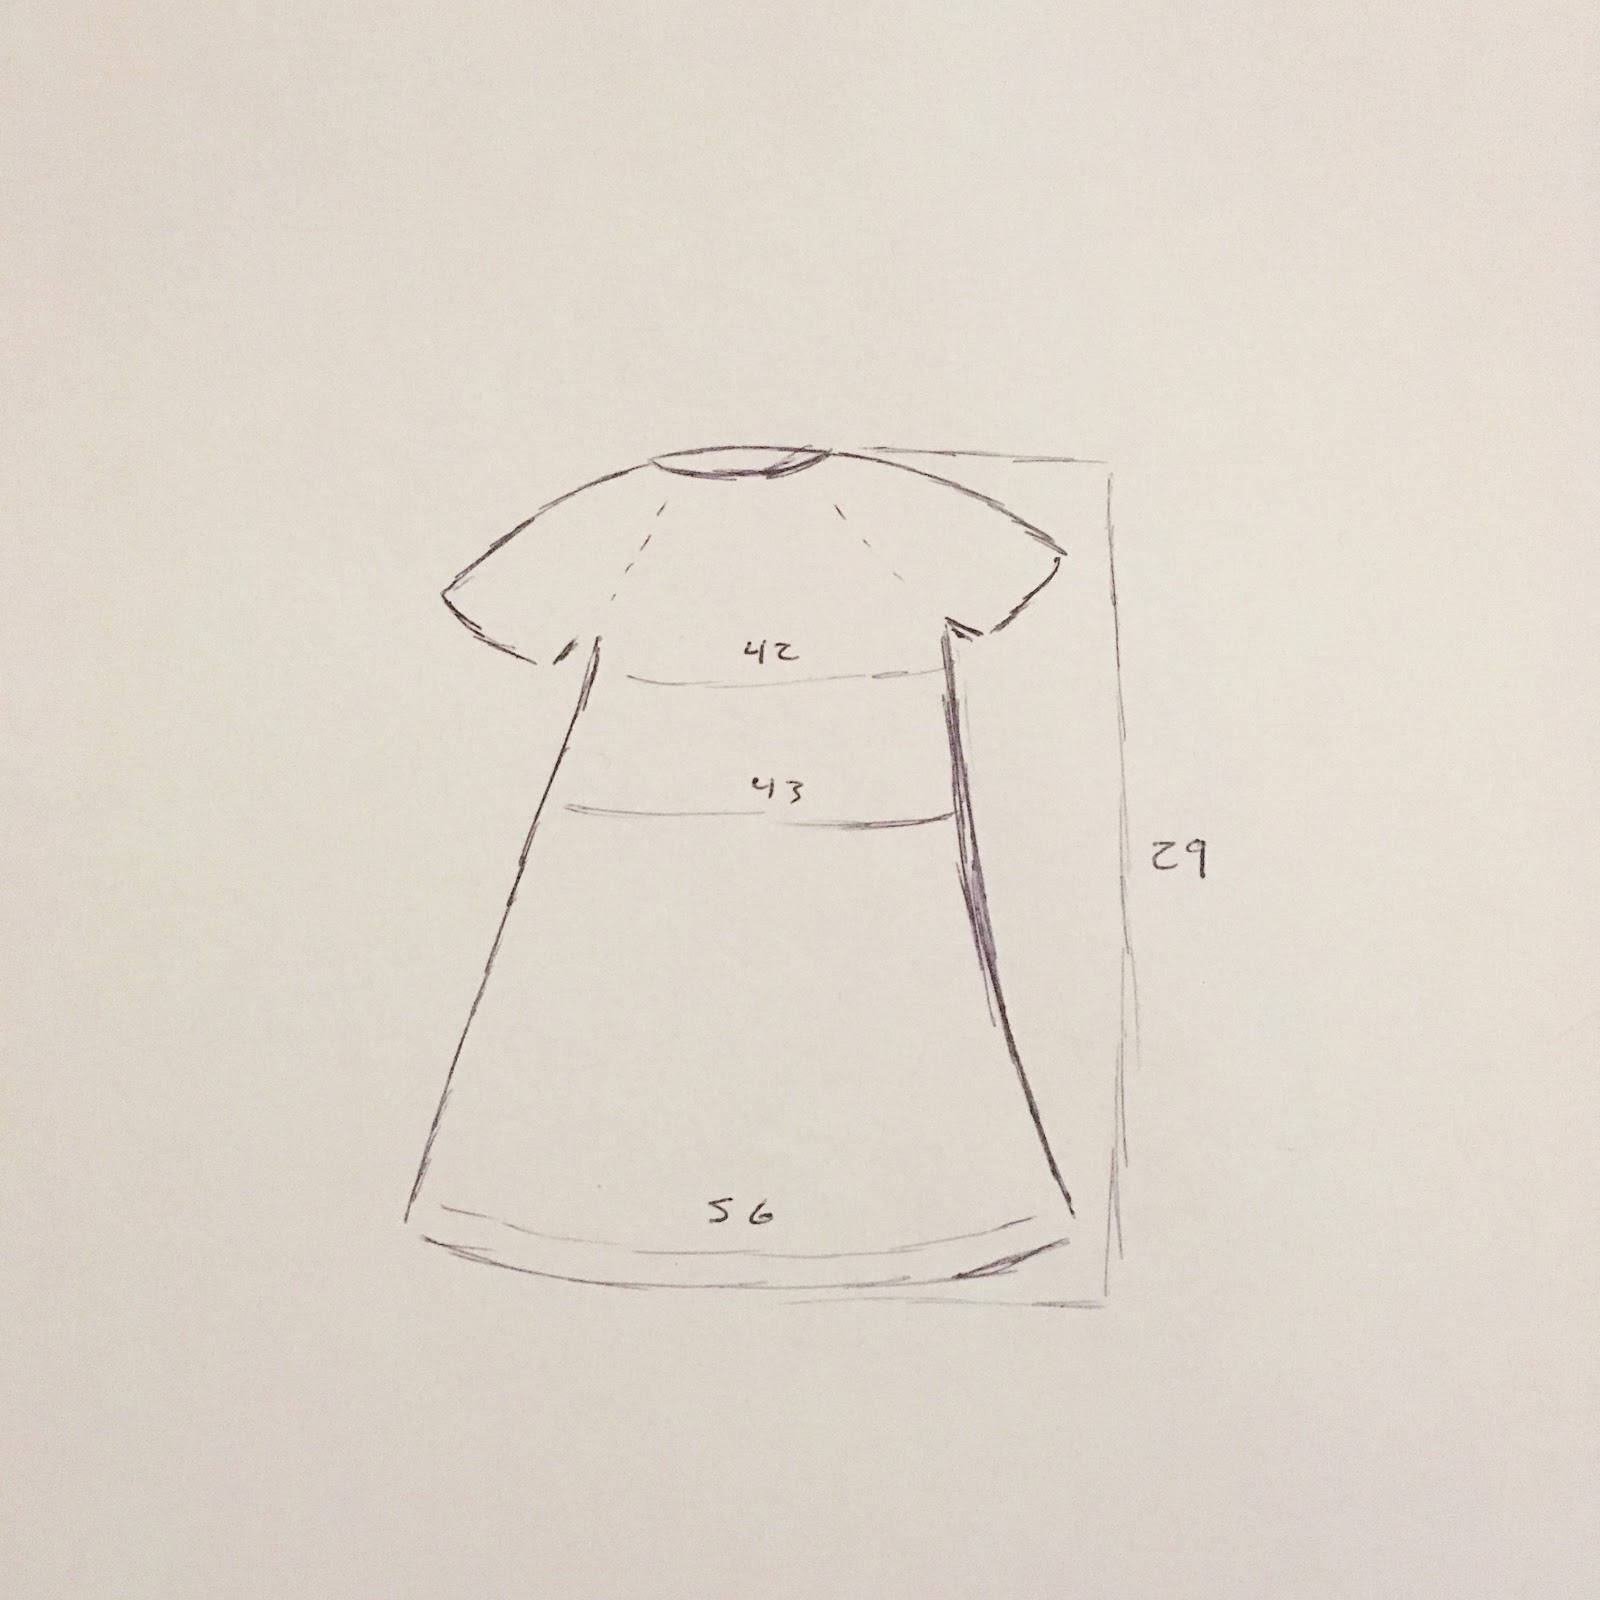
I am not great at drawing, but here is a rough sketch to show the finished shape and measurements of the tunic.


I am very pleased with this tunic, and I hope that you like it to, if you have any questions please don't hesitate to leave a comment. This is my first time writing a knit pattern and just because it makes sense to me doesn't mean it's as intuitive to everyone else. 

Shout out to my friend Hilary from The Cutie Life for helping me take pictures. Thank you! 


Thursday, August 25, 2016

Rose Print Knit

I don't usually wear a lot of tank tops, but it's been so hot recently that the idea of sleeves is just terrible. I know, the rest of the country is like, "shut up, it's 85 degrees" but for Washington that is killer hot. I like it here because it stays between 40 and 70 for 90% of the year. So after I made the two Sorbetto tanks I pulled McCall's M6794 and a rather precious rose print knit out of my closet.

The rose print is really sweet, and although I like it, it's not something I would have bought on my own, but I got it out of my grandmother's stash (which also means I have no idea what the fiber content is, but I'm guessing it's got some polyester in it). I was going to use it to make a ruched t-shirt, but I couldn't find the pattern, I don't actually remember if I really bought it, or just meant to buy it, so I made a tunic length tank top instead. I barely had enough fabric, like not even an inch to spare.


The fabric is a little bit on the see-through side. I originally put it on with denim capris and hated the fact that you could see the contrast between the dark denim and my skin through the top so I threw on a pair of white leggings instead (M6360 view c that I made a couple of years ago). I feel very all white in this outfit, I think what it really needs is a pale green pair of leggings, but white was what I had, so it was what I wore. I've only very recently embraced the leggings trend, but now I'm thinking I need to make more in more colors. But I will still only wear them if my rear is covered. I've been told by girlfriends that what I call a tunic the rest of them call a dress. 

A couple of notes on the tunic pattern: The pattern envelope says you can make it in a woven or a knit. Obviously, I chose a knit. The patterns works but the instructions and more importantly the grainline markings all assume that you are using a woven. If you make this pattern with a knit think very carefully about the direction of stretch when you are laying out your pattern pieces. The neck and sleeves are meant to have a double-fold bias facing, I changed that to single fold, but I still feel like it's too bulky, I wish, considering that knits don't unravel, that I had just folded it over once and sewed it down. 

I also played with a twin-needle to do the hems on this. On the one hand, it does look more professionally finished then zig-zagging or leaving them raw, but on the other hand, I had a really hard time adjusting the tension on the machine to make it work. I had to set the tension at the loosest that it would go and I'm still seeing a little bit of distortion because the stitches are too tight and I really don't like that.

All in all, I don't think this is going to become one of my favorite tops, but it was cool and comfy on our recent 90 degree day, and since I can't wear it to work anyway it doesn't matter if it's my favorite.

Sunday, October 25, 2015

Tree Tunic

I know I've had a busy weekend when it is 8:30 on Sunday and I am only just sitting down to write my blog post. I've also nearly got the blog caught up with my projects. Clearly I need some extra time to spend crafting!

Today's project was one that I made last weekend. A couple of months ago I ordered some polyester crepe online. Shipping was nearly the same cost as a full yard of fabric so I ordered a second fabric to get free shipping. The second fabric was one that was cute, but I honestly wouldn't have ordered it just on its own. It was a fun Cotton + Steel print and I had heard three positive reviews of the brand from three separate sources within a week. Based on the picture online I thought it was a gray fabric with trees and dresses on it. It was fun and funky. I got two yards thinking it would make a cute, novel, skirt. Well, a week later I got an email saying the main fabric that I wanted as actually out of stock and unless I responded within 24 hours I would be refunded the price for it and just shipped the Cotton + Steel fabric. I read that email at hour 25, too late to cancel the order, which is what I would have done.

Fast forward another week and my single fabric arrived, and much to my horror it was not gray, it was more of an olivey-gray-green color. It also had white blobby ghosts on it that I hadn't noticed in the picture online. It was in no way shape or form a neutral and I think it would have made an awful skirt because I would never have found a top that looked cute with it. So, greatly disappointed, I put it in the stash and moved on.

Last weekend I pulled it back out. Maybe it's because Halloween is so close, but I felt like it was time to do something with the slightly creepy fabric. I decided on a tunic and pulled out the Simplicity pattern from Sailboats Galore Again and got to work. This time I left off the pockets and used grosgrain ribbon for the ties. I used single fold bias tape to hem to hem the arm and neck openings, but I did a simple narrow hem for the bottom of the tunic.

And here it is from the front:


And a view of the back. 


I really like this tunic pattern. I think it made the most of the slightly odd pattern of the fabric. I should have taken a picture of just the fabric because you can't really see the details of it in either of these pictures. 

And I will say this for the weird color: I think it makes my hazel eyes look a bit greener.

I might by Cotton + Steel again because it was a nice quality cotton, but I will not be buying it online again.