Sunday, November 13, 2016

Lace Gloves

So, I had a really cute Halloween costume idea, but I ended up with a migraine, so I didn't do anything for Halloween this year. Just as well because the dress I made for my costume was several sizes too big and I still haven't decided if it is worth the effort to fix. But before I knew all that I made myself a pair of gloves to go with my costume.


The pattern is called Ladylike Gloves. It is free on Ravelry. I've actually been eyeballing the pattern for a while but never had a good enough reason to make the gloves. Sorry, the picture isn't so great, it's really hard to take a photo of your own hand. 

The yarn is Rowan Fine Lace that I had left over from a shawl. The yarn is absolutely delightful, one of the most stunningly soft yarns I've ever had the pleasure of knitting with, but I have to say knitting these gloves was a nightmare. They are done on size three needles and when I started the only size 3s that I had were exceptionally slick metal. My needles kept slipping out of my work as I was knitting. 

I had to set the gloves aside while I hunted for a pair of size 3 double points in wood. Fortunately using wood did solve the slipping problem or I would never have finished these. 

Although I'm happy enough with the finished object I'm not really sure they were worth the effort. I've worn them to work once, and I do like that because of the lace pattern over the fingers I can use my touchscreen and not have to take my gloves off, which is cool, they just were not fun to knit.

Monday, November 7, 2016

Banging Out Some Basics

Sometimes a me-made wardrobe is all about cool flashy pieces that you will be super proud of but not wear too often. Other times it is all about the basics. Sunday was a basics sort of day. I managed to bang out two t-shirts, three camisoles, and five pairs of underpants.


Admittedly all of the pieces were already cut out and some of them were even partially assembled already. I had started working on them before my honeymoon but didn't finish because I had to order some stretch lace online. I hate online shopping so I was putting it off for as long as I could. In the end, I was happy with my order from Deb's Lace and Trims. I got a variety of stretch laces that really do have good stretch and for less than $10 I got enough for everything I made and then some.

They may just be basic boring pieces, but man are they comfy. All the fabric is Telio Organic Cotton Jersey, purchased from fabric.com  I bought one yard of the beige, which yielded one camisole and one pair of underpants. I bought three each of the black and the blue. I made one t-shirt, two camies and three pairs of underpants from the blue and two t-shirts and one pair of underpants from the black fabric.

The camisole and panties are both from Patterns by Gertie B6031. If I could live in them I would. The underpants are the most comfortable pair I have every worn. They have full coverage over the bum so you don't get those awful visible pantie lines and I think they lace is a fun touch. I didn't bother making the straps adjustable and I did use the same 3/4" lace for everything rather than a thinner lace. I love love love the camisole pattern because it has adjustable cups. Heaven.

The t-shirt pattern is by Kwik Sew. I find it to be an easy pattern and a well-fitting t-shirt. I've made it so many times now that I have literally lost count. T-shirts are my go-to when I don't feel the need to look pretty and I'm not going to work. I love them.

Sorry for the total lack of pictures. You will just have to take my word for the fact that everything fits like a dream. I don't think I will every get to the point where I am willing to post a photo on the internet of me in my underwear.

Sunday, October 23, 2016

Finished Jacket

In my last post I talked about underlining the Butterick 6390 jacket for a bit of extra warmth, well today I'm going to talk about installing the regular lining for the jacket. 

Because of the flannel underlining, I decided to line the sleeves of the jacket, not just the body as originally instructed. So I sewed the front, back, and sleeves onto the jacket then did the same for the lining. 

Here they both are. The shell is right side out, the lining is inside out, that way then they are put together all of the raw seams are to the inside of the jacket. 


Then I inserted the lining into the shell. The trickiest bit here is making sure that the sleeves don't twist otherwise they will bind and not be comfortable. Another note on the sleeves, when sewing them to the body keep in mind that the shoulder seam actual sits forward of the shoulder, not on top, so don't try to match the top of the sleeve to that seam. 


Next, I pinned every opening, starting with the neck, then the bottom, then the sleeves, and finally the front. The front of the jacket folds over to create the button band and to secure the lining to the shell. I followed the fold line on the pattern piece, but I think I messed it up a bit because my collar comes all the way to the neck edge and my bottom band was very nearly too short, but in the end I am happy with the fit and I didn't bother sewing buttonholes all the way up the band so I doubt that anyone would notice the collar isn't right (except of course, that I just told you. Oops). 

Once everything was pinned in place I sewed the button band. 


Next, I sewed on the bottom band. This required the most careful pinning just because it was so long and the lining is super slippery. It really didn't want to stay in place. That was also the reason that I pinned the lining in place even though I knew I would be removing those pins to add the cuffs, collar, and bottom band. 


Finally, I add the collar and cuffs. The pattern directions skip adding the collar. On step 30 they don't show it attached, but on 31 they do with not a word on how to sew it on. Fortunately, it is pretty easy. Unfortunately, I totally forgot to take pictures. Just fold and press it in half, right sides together, sew the two short edges at 5/8", clip the corners and turn right side out, press again. Pin and then sew one edge to the neck, flip it up, fold over the inside edge and top stitch it down. 

The cuffs were means to have button closures, but the sleeves were wide, and I didn't like the pattern's sleeve placket or lack thereof. I was going to add my own, but frankly, I got lazy, and ultimately just sewed the sleeves shut and sewed on the cuffs. 

Ta da! Almost finished jacket. It just needs buttons and buttons holes at this point.


It took me a couple more days to get that far. Gosh darn that whole having to go to work thing, right? Just kidding, I love my job, but it sure does cut into sewing time.

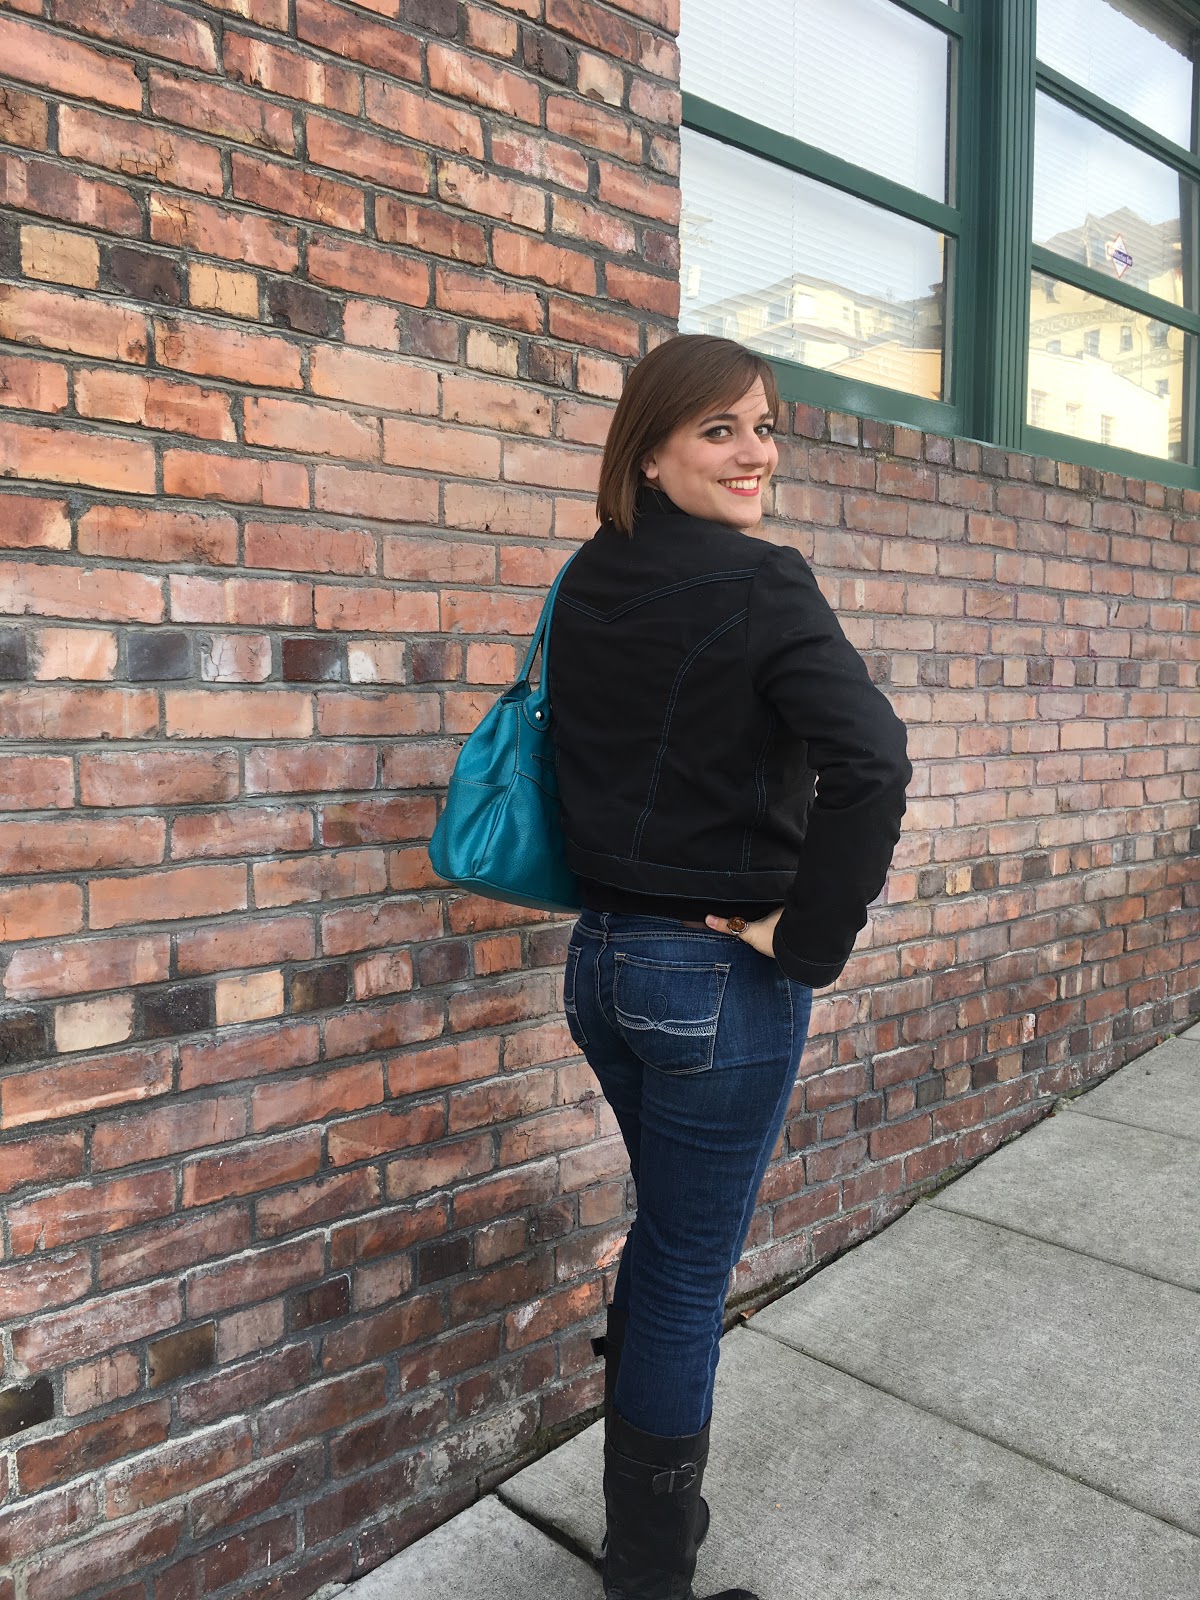
Yesterday I went to the PNW Socktober Yarn crawl, (and yes, I will have a post about that coming up) and took a moment to model some photos of the jacket. 


I just love the contrast top stitching, especially on the back, it really shows off the structural lines of the jacket so well! They are much more eye-catching in person than in the photo. 


And I got the best compliment that a home sewer can get, a random stranger asked me where I bought my jacket because they wanted one too! I love my new jacket, and I am happily anticipating getting a lot of wear out of it. 


Sunday, October 16, 2016

Interlining/Underlining a Jacket

I'm sure it will come as a surprise to absolutely no one that the fall sewing patterns are out and I've started working on one by Gertie. Here is a photo of it that I pulled off of her blog.


To be perfectly honest I think it looks a little dorky buttoned all the way to the top like that, but it would be cute with the top button left undone and it's the perfect jacket for fall weather. 

I was recently gifted significant yardage of a black poly/cotton blend bottom-weight by one of my stepdad's coworkers and I thought it would work well for this jacket. I'm lining it with an anti-static polyester. I wanted some kind of cute print, but I couldn't find one that I liked at Jo-Ann's so I went with my signature shade of blue instead. 

In addition to lining the jacket, I am also underlining or interlining it (I've seen both terms used and I'm not sure if one is more or less correct than the other). 

I've never tried underlining a garment before, but I think it's a neat technique. Basically, you use a second fabric to change the characteristics of your outer fabric. So you can add opacity to a sheer fabric, or add body to a limper fashion fabric. It can also be used to hide stitches when hemming because you just pick up the underlining fabric. In this case, I'm adding flannel to my shell fabric to add warmth without adding significant bulk. 


Sorry, I can't figure out how to rotate the picture. Anyway, here you can see my lining fabric on top, my shell in the middle and the flannel on the bottom.

When you underline a garment you cut your outer fabric pieces, then you cut the exact same pieces out of your underlining fabric and hand baste them together. I maybe could have thrown on my walking foot and sewed them together that way, but you want the grainlines to match and it's easy for fabric to twist on the machine, so I took this as an opportunity to practise using a thimble. 

I've already sewn the underlining to the shell in my photo. The underlining fabric will be completely hidden in the finished garment, so it didn't really matter what color I chose, I picked the blue 1) because I didn't want to risk muddying the color of my lining fabric and 2) because it's easy to see at a glance which fabric is which. The underlining fabric becomes the wrong side, so the contrasting color makes that easy. 

And speaking of wrong sides, if your shell fabric doesn't have a right and wrong side, like mine didn't, you are going to be designating one here, so make sure that you have right and left side pieces, not two rights, or two lefts. 

I've got all my underlining fabric sewn to my shell, so now I'm working on actually sewing the jacket together. From this point on the underlined pieces are treated as normal fabric pieces. Because of the underlining I am having to change the lining too. The original pattern doesn't call for the sleeves being lined, just the body, but flannel doesn't slide well over other fabrics, so I'm adding lining to the sleeves. My next post will be about how I make that change. 


Sunday, October 9, 2016

It's Socktober!

Hey y'all,

Don't you just love the myriad funny words that October gets turned into? I find it really amusing. My favorite one by far is Socktober though. I love knitting socks. I've always got a pair going because they are the perfect project to keep in your purse and pull out during downtime. Just remember to wrap the ends of your DPNs with rubber bands so you don't loose stitches or one of your needles!

On the other hand, I finish socks really slowly because they just live in my purse.

So my most recent pair I started back in August and I just finished the second sock last night. I was putting off doing the Kitchener stitch, the toe has been finished since Thursday.


So there they are. The Pattern is The Weasley Homestead by Erica Lueder. I really love her sock patterns. It tickles me that they are all Harry Potter inspired, but mostly I just like that they fit well, I love the way she does her heels and toes, and I've never had one end up slouchy on me. There is nothing worse than having to constantly dig into your boot to hitch your sock back up, right?

The yarn is Serenity Sock weight yarn, I got it at JoAnn's a while back. It was dirt cheap, but it is more of a light fingering than a proper fingering weight. The color combo is delightful, it's the same brand that I used to make Husband his Wedding Socks. I got a sock and a half out of one skein, so I've got a bit left over now. I might try for a pair of anklet socks before I toss it in the Sock Yarn Scrap Blanket bin. I've got two more skeins in black (I said it was dirt cheap, right? I stocked up). I will probably use the black to make a pair of socks for Husband. He does like boring colors. 

Tuesday, October 4, 2016

Linen Tunic Pattern

Ah fall, it is by far my favorite time of year. It is the time of year for showing off cute sweaters before they are hidden underneath bulky winter jackets. It's also got the best color pallet, dark greens, rusty reds, navy blue and black. I love it.

I decided to celebrate the fall this year with a new knitted tunic. I had some wonderful linen yarn (Lindy Chain by knitpicks.com - who I am totally not affiliated with, I just like it) that was recycled from a different sweater that I knit but never wore. Linen has absolutely wonderful drape, which made it perfect for a loose fitting a-line sweater, but less than ideal for the more fitted cardigan I had originally knit. Live and learn.

So I searched Ravelry for a top-down, a-line, crew neck, short sleeve tunic, in a fingering-weight yarn, but such a pattern didn't seem to exist. So, I wrote one, and now I'm sharing it with you.


I think this is a great transitional piece because when it's still slightly warmer is looks great over some leggings with just a cami underneath, but as the weather cools it will work with a long-sleeve shirt and a pair of jeans instead.


Linen Tunic:

Materials:
11 skeins (1198 yds) Lindy Chain in colorway Linen.
US 3 double point needles or 16" connected needles
US 5 connected needles.

Guage:
27 sts by 33 rows equals 4” in St st.

Size:
Would fit 38-42” bust. Pictured on 40” bust with 2” positive ease.

Instructions:

Neck:
On size 3 needles CO 130 sts, join in round, work k1p1 ribbing until neckband measures 1” Switch to size 5 needles.
place marker for beginning of round and at 65th st.

Shape back of neckline:
K60 sts w&t, p55 sts w&t, k52 sts w&t, p49 w&t, k46 w&t, p43 w&t
knit 2 rnds, picking up wrapped stitches and knitting them as you go

Begin shoulder shaping:
Round 1: Place BOR marker k5 m1 pm k1 m1 k53 m1 k1 pm m1 k10 m1 pm k1 m1 k53 m1 k1 pm m1 k5
Round 2: k
Round 3: k to marker m1 sm k1 m1 knit to 1 stitch before marker m1 k1 sm m1 knit to marker m1 sm k1 m1 knit to 1 stitch before marker m1 k1 sm m1 knit to BOG marker

Repeat rounds 2 and three until there are 120 stitches each for front and back and 74 sts between sleeve markers

Place sleeve on holder, CO 5, pm (new BOR marker), CO 5, knit to next marker, place sleeve markers on stitch holder, CO 5, pm, CO 5 knit to end of round


Body:
Rnds 1-10: Knit
Rnd 11: knit to 1 stitch before pm, m1, k1, sm, k1, m1, knit to 1 stitch before pm, m1,k1, sm, k1, m1
Repeat rounds 1-11 until 1” shy of desired length is reached. (pictured length is 29" so knit 28" from neckline)
Switch to k1p1 ribbing for 1”
BO in pattern

(note: the goal for me was using up all my yarn, so after knitting a couple of body rounds I paused and finished the sleeves, that way I could just knit the body until there was no yarn left.)

Sleeves:
Pick up ten stitches from underside of arm
K 18 rounds
knit k1p1 rib for 9 round
BO

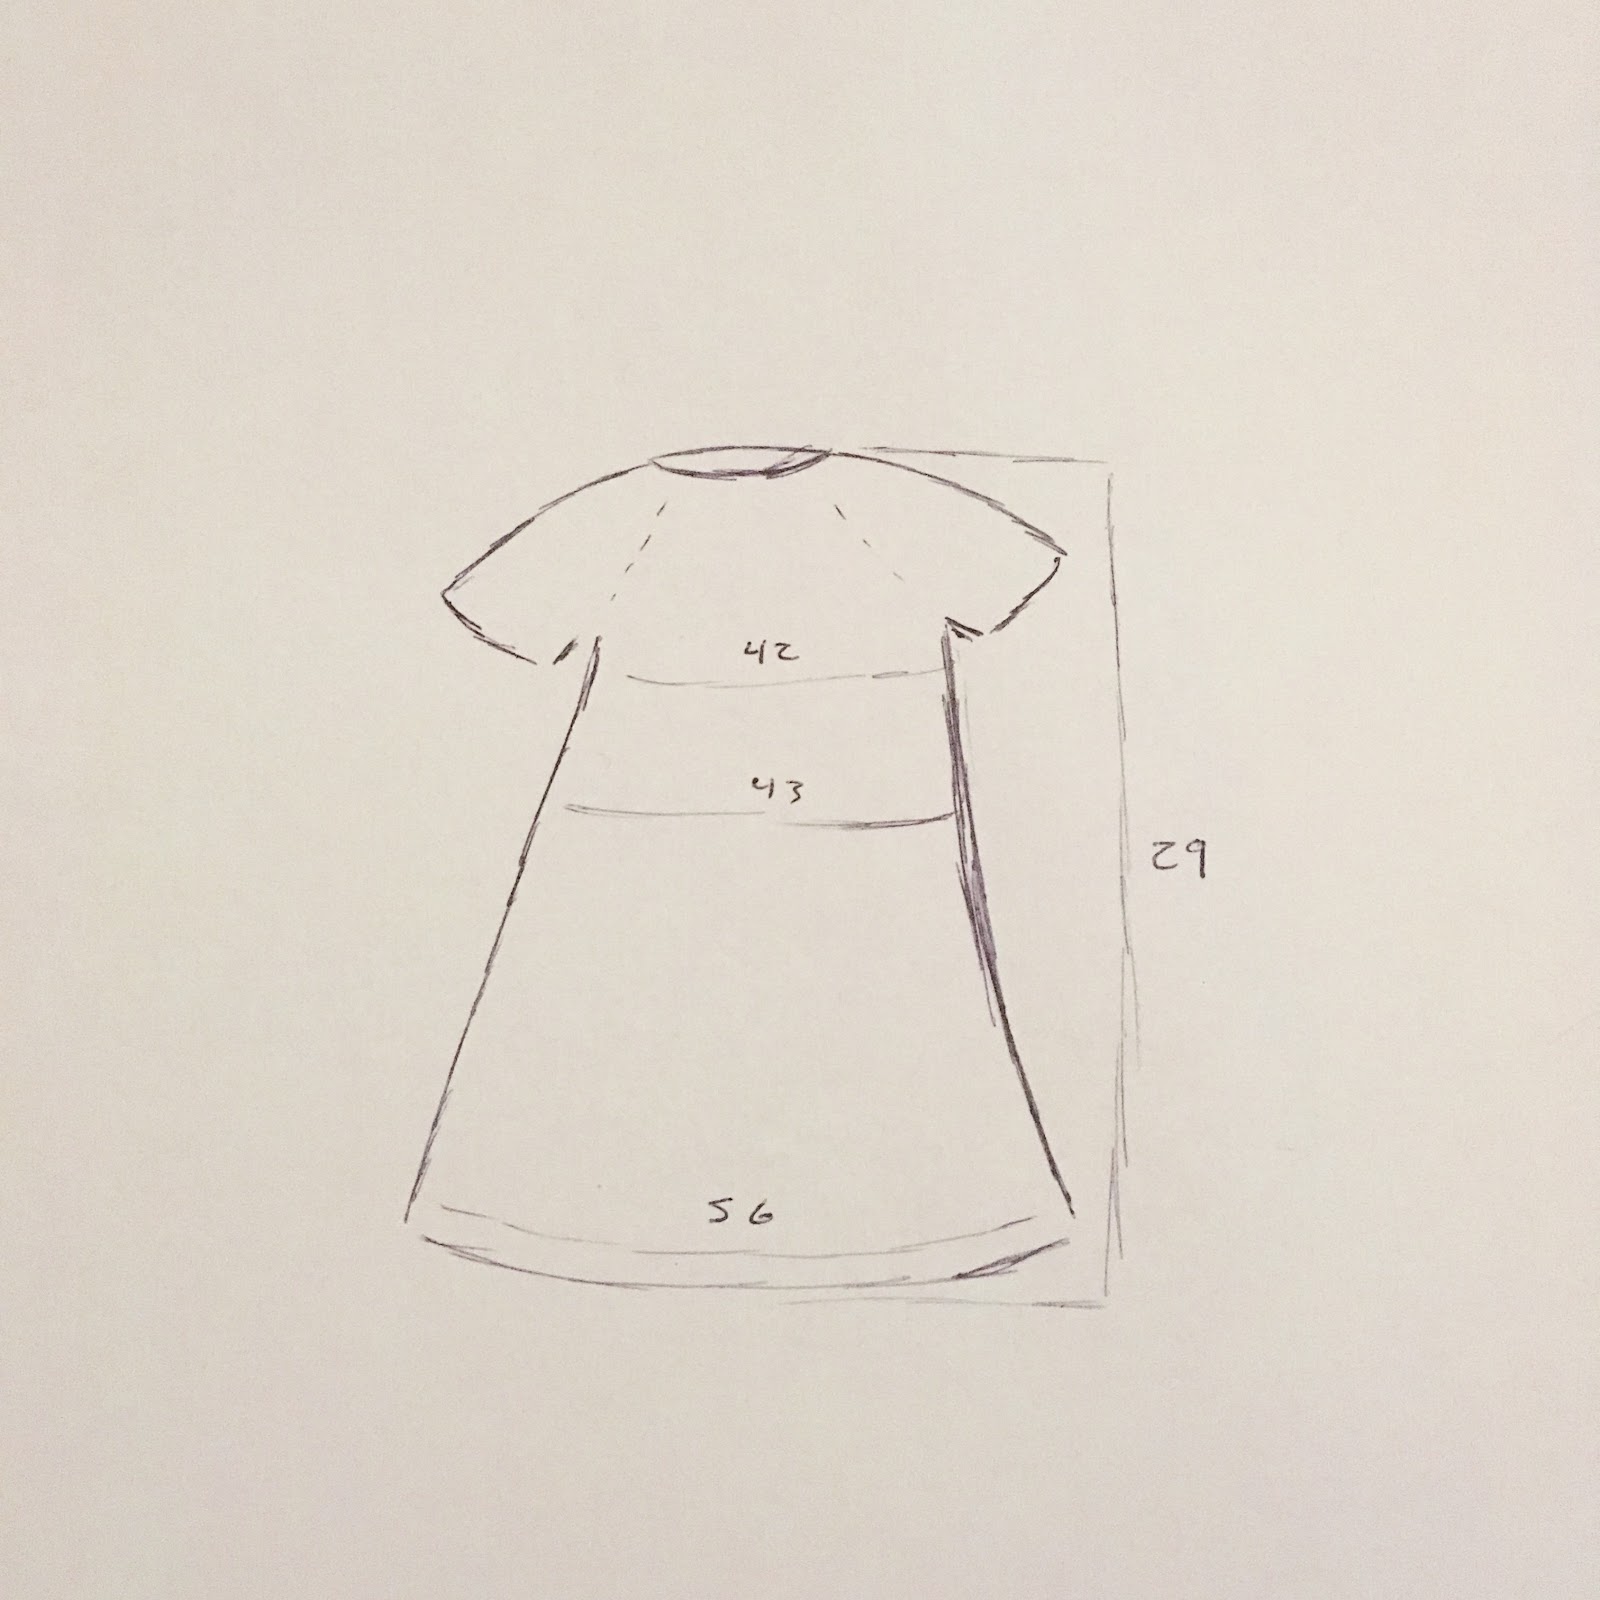
I am not great at drawing, but here is a rough sketch to show the finished shape and measurements of the tunic.


I am very pleased with this tunic, and I hope that you like it to, if you have any questions please don't hesitate to leave a comment. This is my first time writing a knit pattern and just because it makes sense to me doesn't mean it's as intuitive to everyone else. 

Shout out to my friend Hilary from The Cutie Life for helping me take pictures. Thank you! 


Wednesday, September 28, 2016

Wedding Quilt and Bedskirt

I have a personal rule for internet equanimity: don't read the comments. If I want to continue happily about my day I do not want to know what the random strangers on the internet think, it's why I rarely solicit comments on my blog (even though I know inviting discussion helps grow readership), because in my experience, usually, random strangers are cruel. A wonderful exception to that rule is ravelry.com where I participate in the Sew Obsessed forum. That is a wonderful group of people who always make me feel so good about my projects.

My most recently compleated project is a queen size quilt. I'm not really much of a quilter and I was feeling a little self-conscious about some of the mistakes on my quilt, so I wasn't sure I wanted to post it, but I did. I prefaced it by saying is was only mediocre and I've received nothing but positivity and support about it. People said things like I must use a different definition of mediocre then them and that there never was a quilt made with perfectly straight lines. Thanks to the support of random internet strangers I am feeling much happier with my finished object so I wanted to share it with you also. I wish the rest of the internet was as pleasant as that group.


When I got married my goal was to make as much that was reusable as possible and to spend as little money as I could get away with (I'm pleased with my success on both counts). One of the ways I did that was making bunting to hang from the ceiling of my venue. 


All of the fabric used in that bunting came from my grandmother, my mom, my mother-in-law or my own stash of fabric. That alone gives me a glowy, happy, peaceful feeling. I thought the bunting was a sweet touch and a nice way to bring in some color and it didn't take too long to make, all things considered. And when I was done with it all that fabric became the triangles in my quilt. Now being wrapped in that quilt is like getting a warm hug from all the crafty women in my family.

Like I said, I'm not really much of a quilter. I've never attempted anything that big before, but I pieced the top together, sandwiched batting between it and a giant piece of white cotton, slapped the walking foot on my machine and I stitched about 1/4" away from each seam on the triangles in nice long diagonal lines. 

I really like the pattern that the quilting made on the backing too. 


I know white on white is hard to see, but it makes a cute little Star of David. 

I used a bright white 100% cotton batting. I like cotton for batting because it's still thin, but it has more weight to it than poly or blends. I like a quilt to be a bit heavy, but not too stiff. I stuck to minimal quilting partly because it was less intimidating and partly because the less you quilt it the less stiff the finished quilt it. This particular batting only had to be quilted every 10" so my 6.5" triangles fit the bill just fine. 

The other fabric you may have noticed in the shot of my venue was the burlap runners on all the tables. 

I was going to just use burlap table clothes, but Husband was convinced that it would be scratchy. I kept saying no one was going to be rolling naked on the tables, but he was adamant. Fortunatly, my mother-in-law had white table cloths so I bought 20 yds of burlap and cut it in half and hemmed it to make table runners instead. At the time I was grumbling about the extra work but now I'm happy about it because the tables looked cute and the runners were easy to reuse. I turned them into a bed skirt.


The finished length of my table runners was 2.5 yds and I used 8 of them (so 20 yds of fabric, but the yardage is cut in half, you would need to buy 10 yds of burlap to replicate this). I sewed them to the remains of an old fitted sheet I got from my mom. I didn't want the pleats to look too even and mechanical so I just did them randomly by hand as I was feeding the fabric through the machine. Since I had already hemmed the fabric it only took about 2 hours to finish this project. 


And I think it looks great with the quilt. Now the bed just needs like 6 or 8 more pillows (I love pillows, Husband thinks they are stupid, but I think he is going to lose this battle) and a headboard and it will be perfect! When Husband and I first started dating more than 6 years ago I made him buy a mattress but I bought the sheets and comforter. We've had the same one since then and I am totally sick of it now. I'm really glad that I was able to repurpose wedding items into a nice update for our bedroom decor. The comforter is still under there, the quilt isn't warm enough for winter all on its own, but at least I don't have to look at it anymore and I've still got some burlap left, so I might make it into pillows, or curtains, or something, I'm not sure yet, but for the moment I am pleased.