Sunday, August 28, 2016

Princess Seam Blouse Again

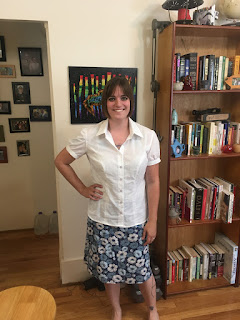
About a year ago I made McCall's 6035 button-up blouse with princess seams in five different colors and by the time I finished the last one I was way super sick of the pattern. Well, apparently it takes me a year to get over that because I just finished a new blouse. 


This one is made from the cotton lawn left over from lining my wedding dress. It is rather transparent so tank-tops underneath are an absolute must. So was fully finishing the seams because you can see them through the shirt. At first, that annoyed me, but I've successfully convinced myself that it's just a design feature. I do wish that I had realized how visible they were going to be. I don't think I like how lumpy the clean seams look on the princess seams. I don't know how hard it would be to do a flat fell seam on a princess seam, but I really want to try it now because I can't think of anything else that has a hope of laying prettily and working as a design element. I did french seams on the sides and flat fell seams on the shoulder and arms. The collar and cuffs are both slip-stitched from the inside. 

I did lengthen the shirt by two inches this time around. I have found the when I am working I'm constantly tugging on the bottom of my shirt because they feel a little short. This shirt is a bit too nice to wear to work but I might make a couple more at this length because it does fit better and the whole point of making my own clothes is to have clothes that fit like they were made for me.


One of the reasons that I keep coming back to this pattern is that it has multiple bust sizes. I really like that I can easily achieve a tailored fit without having to do a full bust alteration. It just makes life so much easier. 

I'm not sure that I'm ready to whip out another five of them, but I would like to make one more in a purple lawn because I want to try the different seam finish on the princess seams and because I found some beautiful purple buttons when I was looking for buttons for this shirt. I was inches away from sewing them onto this one but that would have limited what I could wear it with and the point of  a white button-up blouse is that you can wear it with just about anything on almost any occassion. 


Thursday, August 25, 2016

Rose Print Knit

I don't usually wear a lot of tank tops, but it's been so hot recently that the idea of sleeves is just terrible. I know, the rest of the country is like, "shut up, it's 85 degrees" but for Washington that is killer hot. I like it here because it stays between 40 and 70 for 90% of the year. So after I made the two Sorbetto tanks I pulled McCall's M6794 and a rather precious rose print knit out of my closet.

The rose print is really sweet, and although I like it, it's not something I would have bought on my own, but I got it out of my grandmother's stash (which also means I have no idea what the fiber content is, but I'm guessing it's got some polyester in it). I was going to use it to make a ruched t-shirt, but I couldn't find the pattern, I don't actually remember if I really bought it, or just meant to buy it, so I made a tunic length tank top instead. I barely had enough fabric, like not even an inch to spare.


The fabric is a little bit on the see-through side. I originally put it on with denim capris and hated the fact that you could see the contrast between the dark denim and my skin through the top so I threw on a pair of white leggings instead (M6360 view c that I made a couple of years ago). I feel very all white in this outfit, I think what it really needs is a pale green pair of leggings, but white was what I had, so it was what I wore. I've only very recently embraced the leggings trend, but now I'm thinking I need to make more in more colors. But I will still only wear them if my rear is covered. I've been told by girlfriends that what I call a tunic the rest of them call a dress. 

A couple of notes on the tunic pattern: The pattern envelope says you can make it in a woven or a knit. Obviously, I chose a knit. The patterns works but the instructions and more importantly the grainline markings all assume that you are using a woven. If you make this pattern with a knit think very carefully about the direction of stretch when you are laying out your pattern pieces. The neck and sleeves are meant to have a double-fold bias facing, I changed that to single fold, but I still feel like it's too bulky, I wish, considering that knits don't unravel, that I had just folded it over once and sewed it down. 

I also played with a twin-needle to do the hems on this. On the one hand, it does look more professionally finished then zig-zagging or leaving them raw, but on the other hand, I had a really hard time adjusting the tension on the machine to make it work. I had to set the tension at the loosest that it would go and I'm still seeing a little bit of distortion because the stitches are too tight and I really don't like that.

All in all, I don't think this is going to become one of my favorite tops, but it was cool and comfy on our recent 90 degree day, and since I can't wear it to work anyway it doesn't matter if it's my favorite.

Sunday, August 21, 2016

Sorbetto Top

Whelp, I jumped on the Sobetto bandwagon. It seems like every sewer has to make at least one of them (I'm sure that is totally not true at all, but it is a pretty common pattern and I've been seeing a lot of it this summer). If you don't know, the Sorbetto Top is a delightfully versatile tank top and Colette Patterns is kind enough to offer it as a free download.

I had never actually tried printing out and sewing a multipage pattern before. It took me several tries to get it to print the right size. On my particular printer I had to use the zoom function and print at 106% size to get the test square to be the requiste 4"x4" and it took me 6 tries to figure that out. Once I got over that hurdle though the pattern was easy to tape together.

I ended up making two tops in one weekend. After making the wedding vests I had between 3/4 and a yard of mid-weight linen leftover. The pattern calls for both the front and back pieces to be cut on the fold, which would not have fit on what I had left, so instead I added 5/8" to the back and just put a seam down the middle. On the first top I did a mock-french seam because I forgot that I meant to do french seams, but on the second I remembered and did a proper french seam. Linen unravels like crazy so you need a good strong finished seam. Because I have a slight obsession with french seams that is what I used for everything.


Aren't they just so pretty though! That is one of the shoulder seams of the second top that I made. It pleases me to look at, all nice and finished with no unsightly raw edges anywhere. 

Here is a picture of the first Sorbetto Top that I whipped up. For this one, other than adding the back seam, I followed the directions. The blue bias trim is a single fold bias tape, applied the same way you would do a bias facing, but flipped to the front instead of the back to make a cute little detail. 


And speaking of cute details, I also added three buttons. I had way too much fun doing decoritive stitching because they aren't functional buttons. 


The only fit issue I encountered was the arm holes came down too low and part of my bra was visible through them. To counteract that I shortened the sleeves at the shoulder seam. I think I shortened them a bit too much because Husband says it looks like the arms are pinching, but I find the top very comfortable. Unfortunately, because I shortened the top through the shoulders the whole thing is a bit shorter than I would have preferred. 

So on the second top I made a few changes. I added about half an inch of fabric to the underside of the sleeve in order to insure that my bra was covered. I also added four inches to the bottom to get a more tunic length top.


I also inverted the front pleat and left it loose at the bottom. It maybe looks a bit maternity top-ish (Husband says "it is rather ambigious through the torso") but it is also super cool and comfortable and it's been hotter than heck the last week, so I will take looking like I may or may not be pregnant if I can also be a comfortable temprature.


The only other change that I made was using double fold bias tape instead of single fold. I would like to say I had a design reason for doing that, but really, I just grabbed the wrong package at the store. I'm glad that I did though, in the end I like the double fold bias tape better, not enough to change the first one, but enough that if I make this top again I will probably stick with double fold bias tape for the edges. 

And I do think I'm going to make it again. It's a pretty versitle pattern, especially for free. I kind of want to lengthen it an additional four to six inches with the inverted pleat and use it to make night gowns because it is just that comfortable a top. I'm also dreaming of versions with sleeves, but that will never help me get rid of that aweful farmer's tan.

Wednesday, August 17, 2016

Gathered Skirt

Today I thought I would do something a little different and finally move on from wedding related projects. I only have a couple more to talk about, and frankly, they can both wait. Instead, I thought I would talk about a skirt I finished recently.


I had some leftover poly-rayon "linen like" fabric from Jo-Ann's. It is nowhere near as nice as real linen, but it's also half the cost and doesn't have to be shipped to me. The color is much closer to Robin's egg in real life. I wanted to play with my ruffler foot and thought this rectangle would be perfect.

So first I cut out a waistband, then I cut the remaining fabric in half and sewed the two rectangles together using a french seam. Because of that, the skirt is a tad shorter than I would normally wear, but I wasn't sure how much fabric I would need and I didn't want to run out.

Next, I ran my length of fabric through my gathering foot. I set it to pleat the fabric every 6 stitches. I think I would have preferred more gather, but again, I wasn't sure how much fabric the gathers would actually eat up. 


After I gathered all the fabric I attached the waistband. I did so by lining up the center of the waistband with the french seam on the skirt, that way I could attach the zipper to the other side and have both seams be centered. (The waistband started off three inches wide, I folded up half and inch on either side and interfaced the whole thing)


After I sewed the waistband to the right side of the fabric I cut off the remaining fabric at both ends and attached the zipper. I used a clean seam to finish the seam on the zipper side. 


The skirt is cute enough and I had fun playing with the ruffler foot. The whole thing was a bit fast and dirty, for example, I machine finished the hem, although I still hand tacked the waistband to the wrong side to keep my stitches from showing on the right side.I also didn't measure a darn thing, which is why I'm not calling this a tutorial. But hey, the skirt only took about two hours to finish, I will wear it (actually I'm wearing it right now which is why I thought to write up a blog post about it) and now I want to play with the ruffler foot some more. If you have never used one, look them up on youtube. They are crazy looking feet.

Saturday, August 6, 2016

Socks for the Hubby

Forever and a day ago (which in this case means Dec 9th, 2015) I started a pair of socks for Husband. I meant to give them to him for Christmas, but alas, I did not come even close to finishing them on time. Husband does like the leg of his sock to be long, but I don't think his socks are really all that much bigger than my own, but somehow I can whip out a pair of socks for me in about a week, but it takes me months and months to make him a pair. I think it might be because he likes such boring patterns that I get sick of them and just don't take the time to work on them.

Well, I finally finished this pair of socks on July 8th, so instead of Christmas socks, they became wedding socks. It was pure coincidence that they went so well with his gray vest and gray shoes. He is a man of muted color preferences. It worked out nicely, though. I used a light fingering yarn, instead of fingering weight so they came out a bit thinner than typical hand-knit socks, more like dress socks than work socks so they fit his dress shoes.


They may have taken me forever to knit because I got bored, but I am pleased with the finished product. The original pattern is Thermal Weasley's because I was going with a Harry Potter theme to socks for the year, and more importantly, I liked the broken rib stitch pattern, but I made some pretty extensive modifications to the pattern. I lengthened the leg by more than twice what the pattern asked for, and I changed the heel to a slip-stitch heel with a garter stitch edge, and I changed the decreases for the toe to make them more gradual. 

Husband must have liked them also because he showed them off to his Grandmother and Aunt and Uncle. I always love it when he brags about what I make him, it makes me feel like I've done the job well. 

Maybe I will start a new pair of socks for him now. With some luck I bet I could have them done by Christmas.